Upper GI Endoscopy

Upper GI Endoscopy


An upper endoscopy, also called an upper gastrointestinal endoscopy, is a procedure used to visually examine your upper digestive system. This is done with the help of a tiny camera on the end of a long, flexible tube. A specialist in diseases of the digestive system (gastroenterologist) uses an endoscopy to diagnose and sometimes treat conditions that affect the upper part of the digestive system.

The medical term for an upper endoscopy is esophagogastroduodenoscopy. You may have an upper endoscopy done in your health care provider’s office, an outpatient surgery center or a hospital.

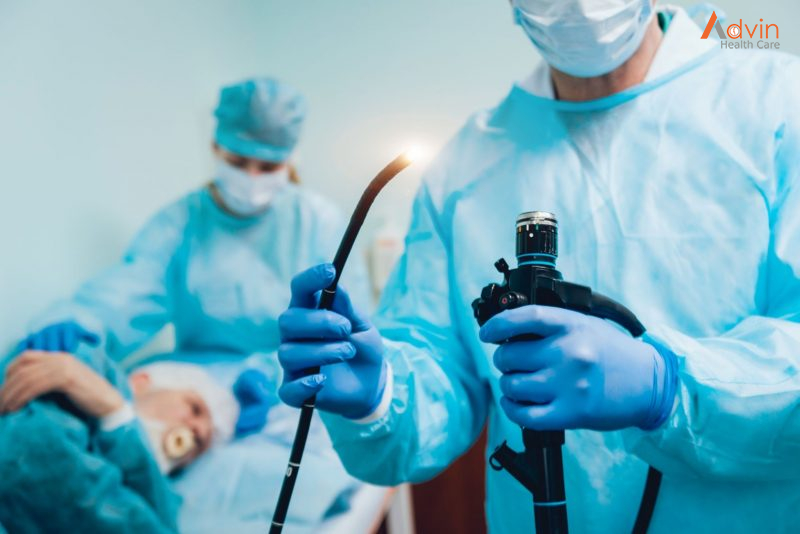
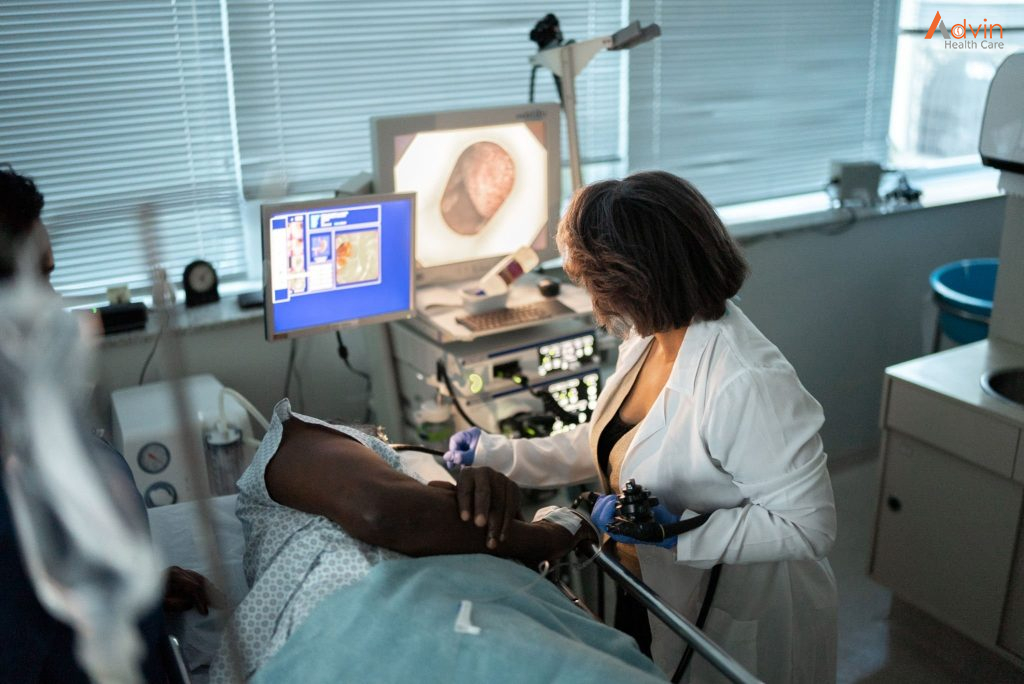
This procedure is done using a long, flexible tube called an endoscope. The tube has a tiny light and video camera on one end. The tube is put into your mouth and throat. Then it is slowly pushed through your esophagus and stomach, and into your duodenum. Video images from the tube are seen on a monitor.

Why it’s done


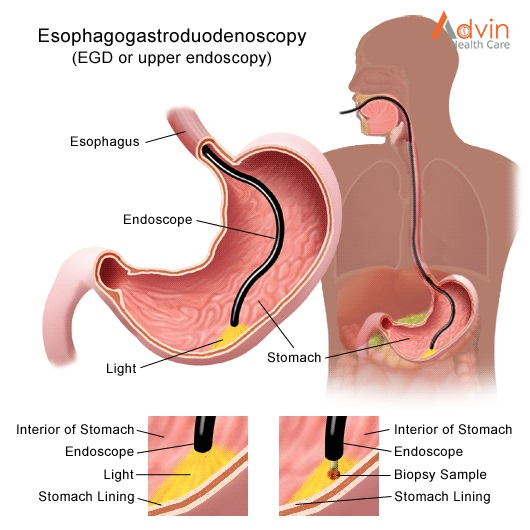
An upper endoscopy is used to diagnose and sometimes treat conditions that affect the upper part of the digestive system. The upper digestive system includes the esophagus, stomach and beginning of the small intestine (duodenum).

Your provider may recommend an endoscopy procedure to:

  • Investigate symptoms. An endoscopy can help determine what’s causing digestive signs and symptoms, such as heartburn, nausea, vomiting, abdominal pain, difficulty swallowing and gastrointestinal bleeding.
  • Diagnose. An endoscopy offers an opportunity to collect tissue samples (biopsy) to test for diseases and conditions that may be causing anemia, bleeding, inflammation or diarrhea. It can also detect some cancers of the upper digestive system.
  • Treat. Special tools can be passed through the endoscope to treat problems in your digestive system. For example, an endoscopy can be used to burn a bleeding vessel to stop bleeding, widen a narrow esophagus, clip off a polyp or remove a foreign object.

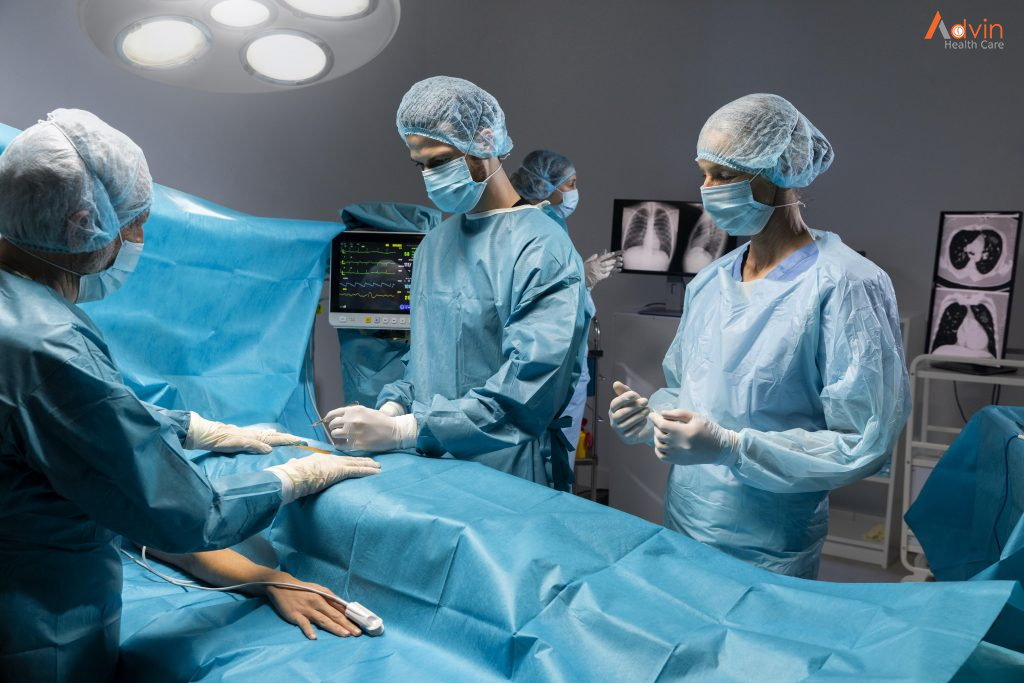
An endoscopy is sometimes combined with other procedures, such as an ultrasound. An ultrasound probe may be attached to the endoscope to create images of the wall of your esophagus or stomach. An endoscopic ultrasound may also help create images of hard-to-reach organs, such as your pancreas. Newer endoscopes use high-definition video to provide clearer images.

Many endoscopes are used with technology called narrow band imaging. Narrow band imaging uses special light to help better detect precancerous conditions, such as Barrett’s esophagus.

How do I get ready for an upper GI endoscopy?


  • Your healthcare provider will explain the procedure to you. Ask him or her any questions you have about the procedure.
  • You may be asked to sign a consent form that gives permission to do the procedure. Read the form carefully and ask questions if anything is not clear.
  • Tell your healthcare provider if you are sensitive to or allergic to any medicines, latex, tape, and anesthesia medicines (local and general).
  • You will be asked not to eat or drink for 8 hours before the test. This usually means no food or drink after midnight. You may be given additional instructions about following a special diet for 1 or 2 days before the procedure.
  • Tell your provider if you are pregnant or think you may be pregnant.
  • Tell your provider if you have a history of bleeding disorders. Let your provider know if you are taking any blood-thinning medicines, aspirin, ibuprofen, or other medicines that affect blood clotting. You may need to stop taking these medicines before the procedure.
  • Your healthcare provider will give you instructions on how to prepare your bowel for the test. You may be asked to take a laxative, an enema, or a rectal laxative suppository. Or you may have to drink a special fluid that helps prepare your bowel.
  • If you have a heart valve disease, you may be given disease-fighting medicines (antibiotics) before the test. This may be recommended in certain situations, such as when dilation is being performed. It is not needed for a standard upper endoscopy.
  • You will be awake during the procedure, but you will take medicine to relax you (a sedative) before the test. Someone will have to drive you home afterward.
  • Follow any other instructions your provider gives you to get ready.

What happens during an upper GI endoscopy?


You may have an upper GI endoscopy as an outpatient or as part of your stay in a hospital. The way the test is done may vary depending on your condition and your healthcare provider’s practices.

Generally, an upper GI endoscopy follows this process:

  1. You will be asked to remove any clothing, jewelry, or other objects that may interfere with the procedure. If you wear false teeth (dentures), you will be asked to remove them until the test is over.
  2. If you are asked to remove clothing, you will be given a gown to wear.
  3. An IV (intravenous) line will be started in your arm or hand. A medicine to relax you (a sedative) will be injected into the IV.
  4. Your heart rate, blood pressure, respiratory rate, and oxygen level will be checked during the procedure.
  5. You will lie on your left side on the X-ray table with your head bent forward.
  6. Numbing medicine may be sprayed into the back of your throat. This will stop you from gagging as the tube is passed down your throat into your stomach. The spray may have a bitter taste to it. Holding your breath while your provider sprays your throat may decrease the taste.
  7. You will not be able to swallow the saliva that may collect in your mouth during the procedure. This happens because the tube is in your throat. The saliva will be suctioned from your mouth from time to time.
  8. A mouth guard will be placed in your mouth. This will keep you from biting down on the tube. It will also protect your teeth.
  9. Once your throat is numbed and the sedative has relaxed you, your provider will put the tube in your mouth and throat. He or she will guide the tube down your esophagus, through your stomach, and into your duodenum.
  10. You may feel some pressure or swelling as the tube moves along. If needed, samples of fluid or tissue can be taken at any time during the test. Other procedures, such as removing a blockage, may be done while the tube is in place.
  11. After the exam and procedures are done, the tube will be taken out.

What should I expect after an upper GI endoscopy?


After an upper GI endoscopy, you can expect the following:

  • to stay at the hospital or outpatient center for 1 to 2 hours after the procedure so the sedative can wear off
  • to rest at home for the rest of the day
  • bloating or nausea for a short time after the procedure
  • a sore throat for 1 to 2 days
  • to go back to your normal diet once your swallowing returns to normal

After the procedure, you or a friend or family member who is with you if you’re still groggy—will receive instructions on how to care for yourself when you are home. You should follow all instructions.

Some results from an upper GI endoscopy are available right away. Your doctor will share these results with you or, if you choose, with your friend or family member. A pathologist will examine the samples of tissue, cells, or fluid that were taken to help make a diagnosis. Biopsy results take a few days or longer to come back. The pathologist will send a report to your health care professional to discuss with you.

What are the risks of an upper GI endoscopy?

Upper GI endoscopy is considered a safe procedure. The risks of complications from an upper GI endoscopy are low, but may include

  • bleeding from the site where the doctor took the tissue samples or removed a polyp
  • perforation in the lining of your upper GI tract
  • an abnormal reaction to the sedative, including breathing or heart problems

Bleeding caused by the procedure often is minor and stops without treatment. Serious complications such as perforation are uncommon. Your doctor may need to perform surgery to treat some complications. Your doctor can also treat an abnormal reaction to a sedative with medicines or IV fluids during or after the procedure.

Advin Upper GI Endoscopy Products


C-Section Surgery Or Cesarean Delivery

Overview


Cesarean delivery (C-section) is used to deliver a baby through surgical incisions made in the abdomen and uterus.

Planning for a C-section might be necessary if there are certain pregnancy complications. Women who have had a C-section might have another C-section. Often, however, the need for a first-time C-section isn’t clear until after labor starts.

If you’re pregnant, knowing what to expect during and after a C-section can help you prepare.

Cesarean deliveries are generally avoided before 39 weeks of pregnancy so the child has proper time to develop in the womb. Sometimes, however, complications arise and a cesarean delivery must be performed prior to 39 weeks.

Why it’s done


Health care providers might recommend a C-section if:

  • Labor isn’t progressing normally. Labor that isn’t progressing (labor dystocia) is one of the most common reasons for a C-section. Issues with labor progression include prolonged first stage (prolonged dilation or opening of the cervix) or prolonged second stage (prolonged time of pushing after complete cervical dilation).
  • The baby is in distress. Concern about changes in a baby’s heartbeat might make a C-section the safest option.
  • The baby or babies are in an unusual position. A C-section is the safest way to deliver babies whose feet or buttocks enter the birth canal first (breech) or babies whose sides or shoulders come first (transverse).
  • You’re carrying more than one baby. A C-section might be needed for women carrying twins, triplets or more. This is especially true if labor starts too early or the babies are not in a head-down position.
  • There’s a problem with the placenta. If the placenta covers the opening of the cervix (placenta previa), a C-section is recommended for delivery.
  • Prolapsed umbilical cord. A C-section might be recommended if a loop of umbilical cord slips through the cervix in front of the baby.
  • There’s a health concern. A C-section might be recommended for women with certain health issues, such as a heart or brain condition.
  • There’s a blockage. A large fibroid blocking the birth canal, a pelvic fracture or a baby who has a condition that can cause the head to be unusually large (severe hydrocephalus) might be reasons for a C-section.
  • You’ve had a previous C-section or other surgery on the uterus. Although it’s often possible to have a vaginal birth after a C-section, a health care provider might recommend a repeat C-section.

Cesarean Section Procedure


1. Cesarean Section Preparation and Anesthesia

Prior to the surgery, you will receive your anaesthesia, which is usually a regional pain block such as an epidural or spinal block. Regional anaesthesia allows you to feel no pain during the surgery while also remaining awake to witness the birth of your child. In some cases of emergency, general anaesthesia is used, which means you will be asleep.

While your anaesthesia is being administered, the room will be busy as the nurses and doctors prepare the room with instruments and the warmer for the baby. Anaesthesia can take about 20 to 30 minutes to administer. The powerful numbing will happen quickly and effectively.3

Sometimes, your arms will be strapped down in a T-position away from your sides. This is done to prevent you from accidentally interfering with the surgery. You may also have a catheter placed. There will be a drape placed at your abdomen to keep you from seeing directly into the incision. However, you will be able to see the doctors, and most importantly, the baby when they are delivered.

2. Initial Incision

you see that the patient has been draped with sterile drapes and is in the operating room as they make the initial incision into the abdomen. In the vast majority of cases, the incision is horizontal (across the lower abdomen, below the belly button, and just above or below the start of pubic hair).

A vertical incision is usually only used in emergencies or complicated cases where better access to the baby is needed quickly. The drawbacks of a vertical incision are that a VBAC is not possible in later pregnancies due to the risk of uterine rupture and the scar is more visible. On the plus side, this type of incision usually results in less bleeding for the mother.

Also, note that there is no need to shave beforehand. Hospital staff will do this if it is necessary, and it might not be.

3. Follow-Up Incisions

There are multiple layers that your surgeon must go through before reaching the baby.

This includes cutting through the skin, fat, into the abdomen, and uterus. The abdominal muscles won’t be cut but will be separated in order to access the uterus. The bladder and intestines may need to be pushed aside, as well.

The doctor will use a variety of instruments during the procedure as they go through each layer of the body. You may also hear whirring noises from a machine used to cauterize (burn) small blood vessels to prevent excess bleeding. Sometimes, there are strange smells, caused by disinfectants and cauterizing, which is a burning smell.

4. Suctioning of Amniotic Fluids

When the doctor reaches the uterus, you may hear suctioning. After cutting through the uterus, the amniotic fluid will be suctioned away to make a bit more room in the uterus for the doctor’s hands or instruments, such as forceps or a vacuum extractor, which are sometimes used (forceps less often than vacuum extractor but more often neither) to facilitate the extraction of the baby.

5. Delivery of Baby’s Head

Your baby is often engaged in the pelvis, usually, head down, but perhaps rear first or breech. Whatever part has entered the pelvis will be lifted out by the doctors. You may feel pressure, tugging, or pulling at this point. Some people report feeling nauseated during this intense, but brief moment.

Although you may feel pressure, you should not feel pain. The anesthesiologist is usually positioned right by your head in order to monitor your pain and general well-being. Alert them if you feel any pain. They will also often keep you informed about everything that is happening during the procedure and can answer any of your questions.

Once the head is out, your doctor will suction the baby’s nose and mouth for fluids. In a vaginal birth, these are squeezed out by the constriction of labor. In a cesarean birth, the baby needs some extra help getting rid of these fluids. If meconium (the baby’s first bowel movement) is present there may be extra suctioning required.

6. Delivery of Baby’s Shoulders and Body

Once your baby has been well suctioned, the doctor will start to help the rest of the body be born. The surgeon will need to maneuver the baby back and forth to help them emerge. You may feel this, but again, while you may experience sensations of tugging or pulling, this should not be painful.

The doctor will check for umbilical cord entanglement or other complications as the body is born. You may also have the assistant surgeon pressing on the upper part of your abdomen to assist in the birth.

7. Baby Is Born

The moment you’ve been waiting for—your baby’s birth! It’s been about 5 to 10 minutes since your surgery started. Your baby will typically be briefly held over the drape to show you, the umbilical cord will be cut, and then, the baby is taken away by a nursery nurse or neonatologist to a nearby warmer, depending on the setup of the operating room.

If your baby goes to the warmer, it is usually in the same room as the surgery. Here, your baby will be suctioned again to ensure that they have help clearing the amniotic fluid. Your baby may also have some basic care like weighing, measuring, cleaning, and vitamin K.

8. Delivery of the Placenta

The next steps are the delivery of the placenta, followed by the suturing of the uterus and all the layers that were cut during the surgery. Once the placenta has been removed, it will be examined by your doctor.7 Closing up everything that’s been cut through to get to the baby is usually the longest part of the cesarean section, which in total typically takes about 30 to 60 minutes to complete.

During this time you can usually have your baby with you to breastfeed or hold. However, don’t feel pressure to begin breastfeeding immediately, you can start any time in the first hours after your baby is born—a small delay won’t cause any harm. Simply enjoying your baby however works best for you is fine. It may also be possible for your support person to hold the baby close to your face if you are unable to hold your baby.

9. Closing the Incision

After everything is finished surgically, your surgeon will stitch your incision shut. While the uterus is typically sutured (sewn) closed with dissolving stitches, the doctor can choose to close the abdominal incision with either staples or stitches.

There are advantages to both methods—staples are faster (saving around seven minutes), while stitches decrease rates of wound separation and infection and usually yield a finer scar.

The type of wound closing used will depend on physician preference and the specifics of your particular surgery. In a planned procedure, you can discuss the options with your doctor. Once closed, the wound will be covered with a bandage.

Advin C-Section Surgery Instrument Set


Angioplasty Surgery

Angioplasty


Angioplasty surgery is done to treat coronary artery disease and restore the blood flow in the body. In Angioplasty surgery, the doctors put a thin tube through the blood vessel containing a balloon at the end that helps push out the substances clotting the blood vessel.

Angioplasty can also be done in combination with stent placement. This combination helps reduce chest pain, breathing problems and reduce stroke risk.

Angioplasty is often combined with the placement of a small wire mesh tube called a stent. The stent helps prop the artery open, decreasing its chance of narrowing again. Most stents are coated with medication to help keep the artery open (drug-eluting stents). Rarely, bare-metal stents are used.

Angioplasty can improve symptoms of blocked arteries, such as chest pain and shortness of breath. Angioplasty is also often used during a heart attack to quickly open a blocked artery and reduce the amount of damage to the heart.

Why it’s done


Angioplasty is used to treat the build-up of fatty plaques in the heart’s blood vessels. This build-up is a type of heart disease known as atherosclerosis.

Angioplasty may be a treatment option for you if:

  • You have tried medications or lifestyle changes but these have not improved your heart health.
  • You have chest pain (angina) that is worsening.
  • You have a heart attack. Angioplasty can quickly open a blocked artery, reducing damage to your heart.

Angioplasty isn’t for everyone. Depending on the extent of your heart disease and your overall health, your doctor may determine that coronary artery bypass surgery is a better option than angioplasty for you.

You may need coronary artery bypass surgery if:

  • The main artery that brings blood to the left side of your heart is narrow
  • Your heart muscle is weak
  • You have diabetes and multiple severe blockages in your arteries

In coronary artery bypass surgery, the blocked part of your artery is bypassed using a healthy blood vessel from another part of your body.

How is Angioplasty Surgery performed?


The procedure to perform angioplasty might seem easy, but it is not that simple. While performing this surgery, doctors go through the following steps that are discussed below:

  1. The doctors insert a long, thin tube-like catheter in the crotch or wrist artery.
  2. The catheter is threaded into the affected artery using X-ray imaging.
  3. The surgeon then injects a liquid dye to check a blockage.
  4. Next, a catheter with a balloon is pushed through the first catheter and steered to the heart.
  5. The surgeon opens the balloon when the second catheter reaches its destination containing the blockage.
  6. After that, the balloon is removed along with the blockage.
  7. If required, the surgeon will then push another thin tube called the stent.
  8. This stent placement prevents the blockage’s re-growth and the narrowing of the artery.
  9. In the last stage, the catheter is successfully removed.

Stent placement


Most people who have angioplasty also have a stent placed in their blocked artery during the same procedure. A stent, which looks like a tiny coil of wire mesh, supports the walls of your artery and helps prevent it from re-narrowing after angioplasty.

Here’s what happens during a stent placement:

  • The stent, which is collapsed around a balloon at the tip of the catheter, is guided through the artery to the blockage.
  • At the blockage, the balloon is inflated and the spring-like stent expands and locks into place inside the artery.
  • The stent stays in the artery permanently to hold it open and improve blood flow to your heart. In some cases, more than one stent may be needed to open a blockage.
  • Once the stent is in place, the balloon catheter is deflated and removed.
  • More X-ray images (angiograms) are taken to see how well blood flows through your newly widened artery.

Most stents implanted during an angioplasty are drug coated. The medication in the stent is slowly released to help prevent future plaque buildup and the re-narrowing of the blood vessel.

After your stent placement, your doctor will prescribe medications, such as aspirin, clopidogrel (Plavix), ticagrelor (Brilinta) or prasugrel (Effient), to reduce the chance of blood clots forming on the stent.

Benefits of Angioplasty & Stenting


Treating blocked arteries with angioplasty and stenting:

  • can save your life and reduce heart muscle damage during a heart attack by restoring blood flow to the heart
  • may immediately relieve or at least reduce symptoms, such as chest pain, shortness of breath and fatigue, making you feel better and able to do more each day
  • can reduce the risk of stroke
  • can improve functioning of the kidneys
  • can restore blood flow to the legs to prevent gangrene and eliminate the need for amputation

Advin products used in angioplasty


Labiaplasty Surgery

What is labiaplasty?


Labiaplasty is a surgical procedure to reduce or increase the size of your labia. The surgery is done to improve the appearance of your labia, to reduce physical discomfort or as part of gender-affirming surgery.

Your labia are the folds of skin around your vagina opening. You have two folds of skin. The outer folds are called the labia majora, which means large lips. These folds are the larger fleshy folds that protect your external genital organs and are covered with pubic hair after puberty. The inner folds are called the labia minora, which means small lips. These skin folds protect the opening of your urethra (where your pee leaves your body) and vagina.

During a labiaplasty and depending on why it’s being done, your surgeon either:

  • Removes some tissue from the labia to reduce its size.
  • Injects a filler material or fat into the labia to enlarge it.
  • Reconstructs a labia from other tissue.

Labiaplasty procedures


Initially, there was a single procedure for labiaplasty, and it was very popular as well. With the change of time and advancement in techniques, several techniques have evolved. Some of them are as follows:

Trim procedure

It is the original technique and is most natural to perform. It is also the most widely used technique used by surgeons. In this procedure, the excess part of labia minora is removed and sutured so that it is symmetrical with the labia majora.

Wedge procedure

In this procedure, a partial thickness wedge is removed from the thickest part of the labia minora. The submucosa (layer tissue beneath a mucous membrane) must be left intact by removing only a partial thickness. This procedure gives the vagina a natural look after the surgery as well, preserving the wrinkled edges.

There are several other techniques for reducing the labia minora, and all these techniques have certain advantages and disadvantages. If you are considering a labiaplasty, the key to ensure appropriate outcomes is to make sure you are going to a board-certified plastic surgeon that specializes in this procedure.

Benefits of labiaplasty


Reduced Discomfort

Discomfort from excessively large or uneven labia can be physical or psychological. Labiaplasty eliminates chafing, tugging and twisting, but also reduces embarrassment and self-consciousness, making daily activities more enjoyable on several levels.

Improved Sexual Pleasure

Labiaplasty can reduce instances of the vaginal lips getting caught, stretched or otherwise interfering with sexual intercourse. Pleasure may also be made more accessible by reducing excess skin around the clitoral hood.

Greater Comfort While Exercising

Large or uneven labia can interfere with running, cycling and other physical activities. Exposed tissue can get chaffed, pinched, pulled and twisted. Labiaplasty makes exercise more comfortable, which can lead to improvements in health and happiness.

Improved Clothing Fit

Embarrassment or physical discomfort can make wearing swimsuits, yoga pants and other tight-fitting bottoms stressful. Labiaplasty can reduce chafing and uncomfortable pressure that occurs when wearing tight clothing.

Improved Hygiene

Excess tissue can make hygiene more cumbersome than it needs to be.

More Youthful Appearance

Hormonal changes may cause the labia to sag, even before the rest of the body shows the signs of aging. Labiaplasty is an excellent rejuvenating procedure that creates a youthful appearance.

Advin product use in labiaplasty surgery


Vaginal Hysterectomy Surgery

Overview


Vaginal hysterectomy is a surgical procedure to remove the uterus through the vagina.

During a vaginal hysterectomy, the surgeon detaches the uterus from the ovaries, fallopian tubes and upper vagina, as well as from the blood vessels and connective tissue that support it, before removing the uterus.

Vaginal hysterectomy involves a shorter time in the hospital, lower cost and faster recovery than an abdominal hysterectomy, which requires an incision in your lower abdomen. However, depending on the size and shape of your uterus or the reason for the surgery, vaginal hysterectomy might not be possible. Your doctor will talk to you about other surgical options, such as an abdominal hysterectomy.

Hysterectomy often includes removal of the cervix as well as the uterus. When the surgeon also removes one or both ovaries and fallopian tubes, it’s called a total hysterectomy with salpingo-oophorectomy. All of these organs are part of your reproductive system and are situated in your pelvis.

Types of hysterectomy


There are various types of hysterectomy. The type you have depends on why you need the operation and how much of your womb and surrounding reproductive system can safely be left in place

The main types of hysterectomy are:

total hysterectomy – the womb and cervix (neck of the womb) are removed; this is the most commonly performed operation

subtotal hysterectomy – the main body of the womb is removed, leaving the cervix in place.

total hysterectomy with bilateral salpingo-oophorectomy – the womb, cervix, fallopian tubes (salpingectomy) and ovaries (oophorectomy) are removed.

radical hysterectomy – the womb and surrounding tissues are removed, including the fallopian tubes, part of the vagina, ovaries, lymph glands and fatty tissue.

Why it’s done


Vaginal hysterectomy treats various gynaecological problems, including:

  • Fibroids: Many hysterectomies are done to permanently treat these benign tumors in your uterus that can cause persistent bleeding, anemia, pelvic pain, pain during intercourse and bladder pressure. For large fibroids, you might need surgery that removes your uterus through an incision in your lower abdomen (abdominal hysterectomy).
  • Endometriosis: This occurs when the tissue lining your uterus (endometrium) grows outside the uterus, involving the ovaries, fallopian tubes or other organs. Most women with endometriosis have a laparoscopic or robotic hysterectomy or abdominal hysterectomy, but sometimes a vaginal hysterectomy is possible.
  • Adenomyosis: This occurs when the tissue that normally lines the uterus grows into the uterine wall. An enlarged uterus and painful, heavy periods result.
  • Gynaecological cancer: If you have cancer of the uterus, cervix, endometrium or ovaries, or precancerous changes, your doctor might recommend a hysterectomy. Most often, treatment for ovarian cancer involves an abdominal hysterectomy, but sometimes vaginal hysterectomy is appropriate for women with cervical or endometrial cancer.
  • Uterine prolapse: When pelvic supporting tissues and ligaments weaken or stretch out, the uterus can sag into the vagina, causing urine leakage, pelvic pressure or difficulty with bowel movements. Removing the uterus and repairing supportive tissues might relieve those symptoms.
  • Abnormal uterine bleeding: When medication or a less invasive surgical procedure doesn’t control irregular, heavy or very long periods, hysterectomy may be needed.
  • Chronic pelvic pain: If your pain is clearly caused by a uterine condition, hysterectomy might help, but only as a last resort. Chronic pelvic pain can have several causes, so an accurate diagnosis of the cause is critical before having a hysterectomy.

Laparoscopic or robotic hysterectomy


You might be a candidate for a laparoscopically assisted vaginal hysterectomy (LAVH) or robotic hysterectomy. Both procedures allow your surgeon to remove the uterus vaginally while being able to see your pelvic organs through a slender viewing instrument called a laparoscope.

Your surgeon performs most of the procedure through small abdominal incisions aided by long, thin surgical instruments inserted through the incisions. Your surgeon then removes the uterus through an incision made in your vagina.

Your surgeon might recommend LAVH or robotic hysterectomy if you have scar tissue on your pelvic organs from prior surgeries or from endometriosis.

Advantages of Vaginal hysterectomy Surgery


Minimally invasive laparoscopic hysterectomy produces excellent patient outcomes and offers many advantages over a traditional hysterectomy, including:

  • Shorter hospital stays. In most cases, LH patients are discharged the same day or require an overnight stay, versus a three-to-four-day stay for traditional hysterectomy patients.
  • Little to no blood loss as a result of smaller, shallower incisions.
  • Lower risk of abdominal infection and other complications.
  • Less pain. Patients generally can use a non-narcotic pain reliever if one is needed, as opposed to IV morphine or other prescription painkillers often given to patients who have a traditional hysterectomy.
  • Faster recovery time. LH patients typically return to normal activities within one to two weeks, compared to four to six weeks for traditional hysterectomy.
  • Minimal scarring. In many patients the scars become virtually unnoticeable.

Laparoscopic Vaginal Hysterectomy Products


Hysteroscopy Surgery

What is a hysteroscopy?


Hysteroscopy is a procedure that can be used to both diagnose and treat causes of abnormal bleeding. The procedure allows your doctor to look inside your uterus with a tool called a hysteroscope. This is a thin, lighted tube that is inserted into the vagina to examine the cervix and inside of the uterus. Hysteroscopy can be a part of the diagnosis process or an operative procedure.

What is diagnostic hysteroscopy?


Diagnostic hysteroscopy is used to diagnose problems of the uterus. Diagnostic hysteroscopy is also used to confirm results of other tests, such as hysterosalpingography (HSG). HSG is an X-ray dye test used to check the uterus and fallopian tubes. Diagnostic hysteroscopy can often be done in an office setting.

Additionally, hysteroscopy can be used with other procedures, such as laparoscopy, or before procedures such as dilation and curettage (D&C). In laparoscopy, your doctor will insert an endoscope (a slender tube fitted with a fiber optic camera) into your abdomen to view the outside of your uterus, ovaries and fallopian tubes. The endoscope is inserted through an incision made through or below your navel.

What is operative hysteroscopy?


Operative hysteroscopy is used to correct an abnormal condition that has been detected during a diagnostic hysteroscopy. If an abnormal condition was detected during the diagnostic hysteroscopy, an operative hysteroscopy can be performed at the same time, avoiding the need for a second surgery. During operative hysteroscopy, small instruments used to correct the condition are inserted through the hysteroscope.

When is operative hysteroscopy used?


Doctor may perform hysteroscopy to correct the following uterine conditions:

Polyps and fibroids: Hysteroscopy is used to remove these non-cancerous growths found in the uterus.

Adhesions: Also known as Asherman’s Syndrome, uterine adhesions are bands of scar tissue that can form in the uterus and may lead to changes in menstrual flow as well as infertility. Hysteroscopy can help your doctor locate and remove the adhesions.

Septum: Hysteroscopy can help determine whether you have a uterine septum, a malformation (defect) of the uterus that is present from birth.

Abnormal bleeding: Hysteroscopy can help identify the cause of heavy or lengthy menstrual flow, as well as bleeding between periods or after menopause. Endometrial ablation is one procedure in which the hysteroscope, along with other instruments, is used to destroy the uterine lining in order to treat some causes of heavy bleeding.

How is hysteroscopy performed?


Prior to the procedure, Doctor may prescribe a sedative to help you relax. You will then be prepared for anaesthesia. The procedure itself takes place in the following order:

The doctor will dilate (widen) your cervix to allow the hysteroscope to be inserted.

The hysteroscope is inserted through your vagina and cervix into the uterus.

Carbon dioxide gas or a liquid solution is then inserted into the uterus, through the hysteroscope, to expand it and to clear away any blood or mucus.

Next, a light shone through the hysteroscope allows your doctor to see your uterus and the openings of the fallopian tubes into the uterine cavity.

Finally, if surgery needs to be performed, small instruments are inserted into the uterus through the hysteroscope.

The time it takes to perform hysteroscopy can range from less than five minutes to more than an hour. The length of the procedure depends on whether it is diagnostic or operative and whether an additional procedure, such as laparoscopy, is done at the same time. In general, however, diagnostic hysteroscopy takes less time than operative.

What are the benefits of hysteroscopy?


Compared with other, more invasive procedures, hysteroscopy may provide the following advantages:

  • Shorter hospital stays.
  • Shorter recovery time.
  • Less pain medication needed after surgery.
  • Avoidance of hysterectomy.
  • Possible avoidance of “open” abdominal surgery.

Advin Hysteroscopy Instrument set


Laparoscopic Surgery

Laparoscopic Surgery


Laparoscopy is just one of the many new and innovative approaches in a new era of surgery encompassing minimal intervention. Simply put, many complicated problems required large incisions to gain access to a very focal area. Minimally invasive surgery gains access to that same area without a large incision. Laparoscopic surgery refers to procedures in minimally invasive surgery isolated to the abdomen.

Early experience in laparoscopy was gained by gynecologists performing tubal ligation by looking through a small telescope inserted through the umbilicus (belly button). In the late 1980s, technology evolved to a point where the images could be projected onto TV screens.

Laparoscopic surgery has evolved tremendously over the last 10 to 20 years. A variety of complicated procedures are now able to be performed laparoscopically with less post-operative pain, faster recovery, and smaller scars than traditional open operations.

Benefits of Laparoscopic Surgery


The advent of laparoscopic procedures revolutionized surgery in many ways. Procedures that required weeks to recover from were dramatically reduced in many ways.

A few of the benefits are:

  • reduced bleeding
  • smaller incisions
  • faster healing
  • reduced pain and scarring

Laparoscopic surgery takes more time than the traditional open surgery, but the benefits are undeniable. Recovery time can be reduced from several weeks to several days.

Laparoscopy Techniques


During laparoscopy, the surgeon makes a small cut (incision) of around 1 to 1.5cm (0.4 to 0.6 inches), usually near your belly button.

A tube is inserted through the incision, and carbon dioxide gas is pumped through the tube to inflate your tummy (abdomen). Inflating your abdomen allows the surgeon to see your organs more clearly and gives them more room to work. A laparoscope is then inserted through this tube. The laparoscope relays images to a television monitor in the operating theatre, giving the surgeon a clear view of the whole area.

If the laparoscopy is used to carry out a surgical treatment, such as removing your appendix, further incisions will be made in your abdomen. Small, surgical instruments can be inserted through these incisions, and the surgeon can guide them to the right place using the view from the laparoscope. Once in place, the instruments can be used to carry out the required treatment.

After the procedure, the carbon dioxide is let out of your abdomen, the incisions are closed using stitches or clips and a dressing is applied.

When laparoscopy is used to diagnose a condition, the procedure usually takes 30-60 minutes. It will take longer if the surgeon is treating a condition, depending on the type of surgery being carried out.

Laparoscopy Products


Laparoscopy Equipment’s

Laparoscopy Instruments

Retrograde Intrarenal Surgery

RIRS (Retrograde Intrarenal Surgery)


Retrograde intrarenal surgery (RIRS) is a newer technique of removal of stones.

Retrograde intrarenal surgery (RIRS) is a procedure to removal stone from kidney by using a fiberoptic endoscope.

RIRS Surgery allows the surgeon to perform surgery inside the kidney without making an incision.

The RIRS can be effective for difficult-to-treat cases, like Tumors, Patients with bleeding disorders and Stones in children.

Reason for RIRS


  • Stones too large for ESWL (lithotripsy).
  • Patients with gross obesity.
  • Strictures or Tumors.
  • Stones in children.
  • Patients with bleeding disorders.

Procedure of RIRS


RIRS is performed by a specialist, urologist with special expertise in RIRS. The procedure is usually done under general or spinal anesthesia.

Ureteric access sheath is placed on guidewire under continuous fluoroscopy.

Flexible Ureteroscope scope is placed through the urethra (the urinary opening) into the bladder and then through the ureter into the kidney.

The stone is seen through the Ureteroscope and can then be manipulated or crushed by an ultrasound probe or evaporated by a laser probe.

Small stones are grabbed by Urology baskets (Nitinol Baskets). After the RIRS Procedure Double J stent is placed for smooth drainage from kidney and avoid blocking in ureter.

Post Operative Care


The patient will be advised to drink a lot of water so that a urine output of 2.5 liters/day can be maintained and infections can be avoided.

If the patient is feeling well there is no need to take rest.

Advantages of RIRS Procedure


  • No skin incision is required.
  • Stone clearance rates are very high.
  • Safe removal of Kidney stone.
  • Low-risk procedure.
  • Lower operating time.
  • No damage to renal tissue.
  • Fast Recovery.
  • Minimum hospitalization.

Percutaneous Nephrolithotomy

PCNL (Percutaneous Nephrolithotomy)


Percutaneous nephrolithotomy (PCNL) is a surgical procedure to remove stones from the kidney by a small puncture through the skin.

Percutaneous means ‘through the skin’ and nephrolithotomy means ‘taking stones out of the kidney’.

Percutaneous nephrolithotomy (PCNL) is most suitable to remove stones of more than 2 cm in size and which are present near the pelvic region.

PCNL Procedure


Percutaneous stone surgery is usually used for larger stones. It is usually done under general anesthesia or spinal anesthesia.

After contrast medium imaging of the kidney tract on the effected side, the kidney is punctured directly through the skin in the area of the flank. The puncture is controlled via fluoroscopy and ultrasound.

A small hollow tube is placed directly through a patient’s back into the kidney through which larger instruments can then be used to fragment and extract the stone(s).

The surgery is performed by Urologist by making a small 1 cm incision in the patient’s flank are. A tube is placed through the incision into the kidney under x-ray guidance. Nephroscope is then passed through the tube in order to visualize the stone, break it up and remove it from the body. If necessary a lithotripter may be used to break up the stone before it can be removed.

The operation usually takes from 90 minutes to two hours.

Aftercare


A standard PCNL usually requires hospitalization for five to six days after the procedure.

The catheter usually stays in place for 1-2 days, depending on how quickly it takes the kidney to recover and the urine to become clearer. The nephrostomy tube will drain urine from the kidney that has been operated on, so the kidney is able to recover. This is usually removed 24-48 hours after surgery.

The urologist may order additional imaging studies (reports) to determine whether any fragments of stones are still present. These can be removed with a nephroscope if necessary. The nephrostomy tube is then removed and the incision covered with a bandage.

The patient will be given instructions for changing the bandage at home.

Patient should be able to go back to work three to four weeks after the operation.

Advantages of PCNL Procedure


  • Less post-operative pain.
  • Less blood loss.
  • Fast Recovery.
  • Shorter hospital stay.
  • higher success rate.
  • Any big size stone can be remove.
  • Earlier return to work and daily activities when compared to open stone surgery.

Ureteroscopy

Ureteroscopy (URS)


Ureteroscopy is where a long thin rigid Ureteroscope is introduced into the upper urinary tract via urethra, bladder, and then directly into the ureter.

Ureteroscopy is an examination of the upper urinary tract the treatment of disorders such as kidney stones in Bladder and Ureter. Smaller stones in bladder or lower ureter can be removed through basket or forcep in one piece, while bigger ones are usually broken through Lthotripsy before removal during ureteroscopy.

Therapeutic ureteroscopy is used in varied applications, including in the treatment of stones, urothelial tumors, and stricture disease.

Ureteroscopy is a safe and minimally invasive method of treating stone disease.

Reasons for Ureteroscopy


  • Kidney stone in the Ureter or Bladder
  • Frequent urinary tract infections
  • Hematuria
  • Unusual cells found in a urine sample
  • Urinary blockage caused by an abnormal narrowing of the Ureter
  • Unusual growth, tumor, or cancer in the Ureter

Procedure of Ureteroscopy


As the procedure is performed under general anaesthesia, you should have nothing to eat or drink for 6 hours prior to treatment.

Doctor gently inserts the tip of the Ureteroscope into the urethra and slowly glides it up into the bladder. A sterile liquid water or salt water (saline) flows through the scope to slowly fill the bladder and stretch it so the doctor has a better view of the bladder wall.

Smaller stones can be removed all in one piece by using Forcep or Stone Baskets.

Larger stones may need to be broken by Lithotripter before then it can be removed by Stone Basket or Forcep.

A temporary urinary stent (Double J Stent) placed in ureter for a short period to ensure the kidney drains without risk of blockage.

Advantages of Ureteroscopy


  • No incision.
  • Ureteroscopy can treat stones located at any position in the ureter and kidney.
  • Ureteroscopy allows the treatment of stones that cannot be seen on an x-ray.
  • In certain cases like women who are pregnant, morbidly obese, Patient taiking Blood Thinner can be treated by ureteroscopy.
  • Can be performed as one day surgery.
  • A highly successful technique (over 95%).