Cosmetic Dentistry

Cosmetic Dentistry: What Are Your Options For Correcting Uneven Teeth?


Everyone wants to smile and laugh with confidence. However, you may be reluctant to flash your pearly whites if you have uneven teeth. Uneven teeth are a common dental issue. Fortunately, there are many effective ways to correct the appearance of uneven teeth so you can smile without hesitation. Some methods are less invasive and complex, like veneers or contouring, while others are more complicated, such as braces. Don’t be shy to smile! Cosmetic dentistry can fix your uneven, crooked, discoloured, or damaged teeth.

How do teeth become uneven?


Uneven teeth can be caused by a variety of factors. For example, genetics, poor oral hygiene, teeth grinding, age, and accidents can all lead to an uneven smile. You may think of your uneven teeth as a purely cosmetic issue. However, uneven teeth can result in other dental issues. You may develop problems with your bite or TMJ disorder, which is a painful jaw condition. Correcting your uneven teeth is one way to help prevent these serious oral conditions from developing.

Veneers


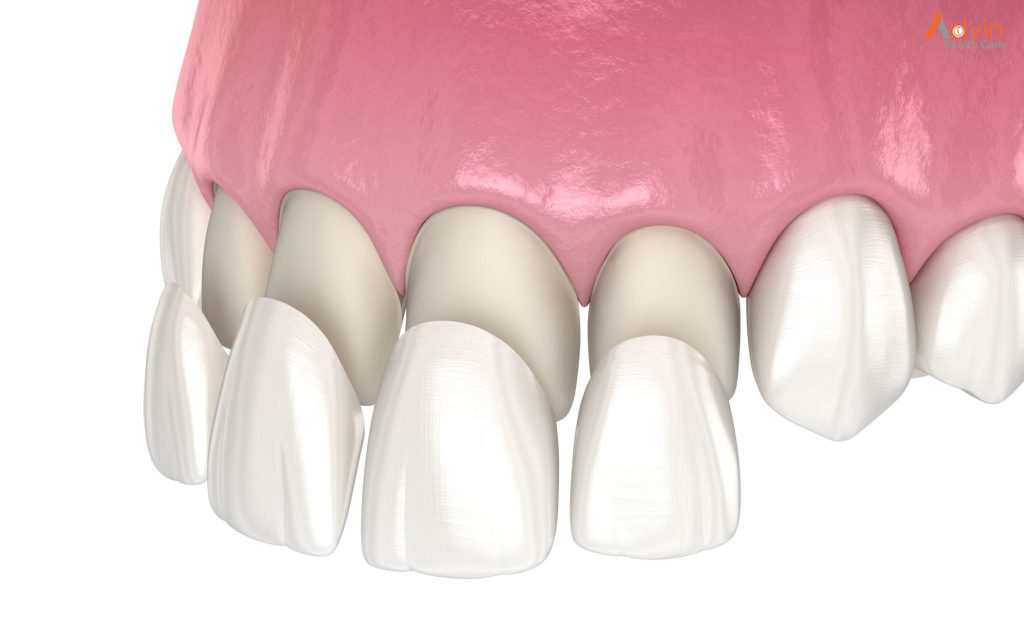
Veneers are thin, tooth-coloured, custom-made, porcelain layers that are bonded to the front of your teeth. They hide minor imperfections such as unevenly shaped teeth, gaps, chips, and cracks. Additionally, veneers can mask worn enamel and discolourations. Dental veneers are not an invasive treatment and can be completed in a couple of appointments. To adhere the veneers to the surface of your teeth, your dentist will first remove a thin layer of enamel to create a smooth surface. The veneer is then attached. Once completed, your smile will be completely transformed. Veneers can alter the shape, size, length, and colour of your teeth to create your perfect smile. However, veneers are not just a cosmetic procedure! They can also improve your bite and eliminate the need for more extensive dental care. Porcelain veneers protect your teeth from further damage and help with proper alignment between bite and jaw. Furthermore, they’re very durable and can last for many years with proper care.

Dental Bonding


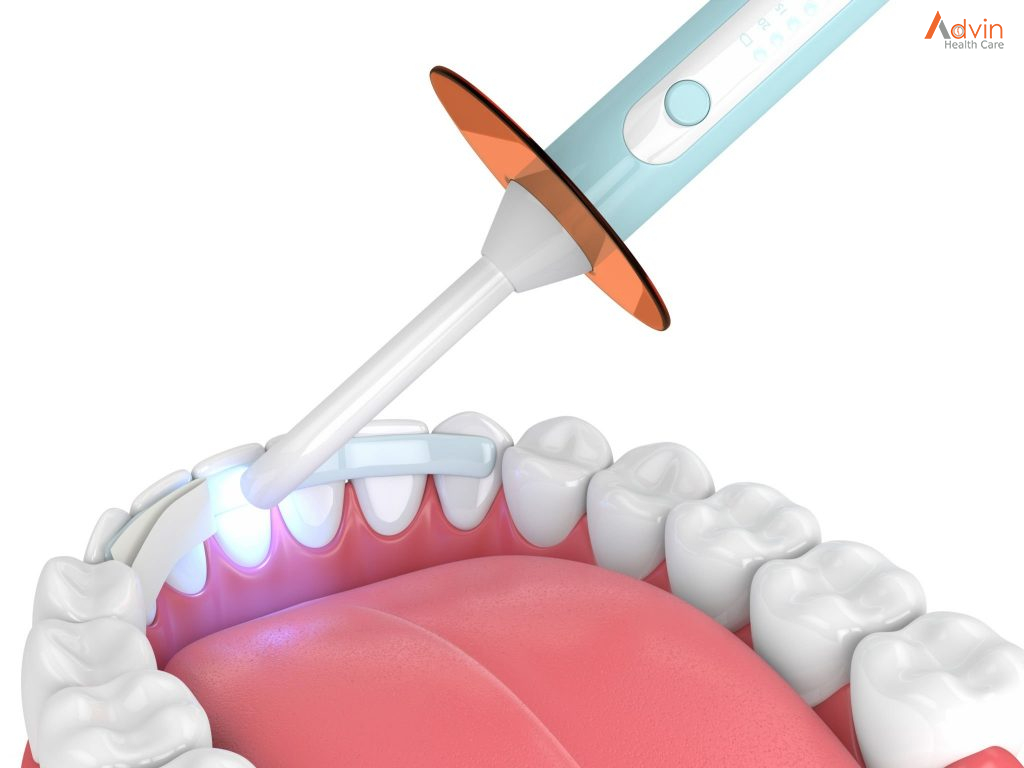
Dental bonding is one of the least invasive dental treatments. It’s also a fairly short procedure that quickly corrects uneven teeth, gaps, and minor tooth damage. Your smile will look straighter and more symmetrical as a result. During your appointment for dental bonding, your dentist applies a small amount of tooth-coloured composite resin to your tooth. The material is sculpted into the desired shape and its colour is adjusted to blend in with your other teeth. Then, the resin is hardened and polished. Once it’s cured, you get to leave your appointment with a dazzling new smile!

Contouring


Contouring, also known as tooth reshaping, is fairly self-explanatory. During this procedure, your dentist shaves off a thin layer of enamel using a rotating instrument called a bur. It corrects minor differences in the shape, length, or surface of your teeth. As a result, all the teeth in your smile will appear more consistent. This technique is a quick way to repair chips, crowding, and unevenness. It’s most commonly used on the front teeth. Also, the whole procedure is relatively painless and rarely requires an anesthetic.

Crowns


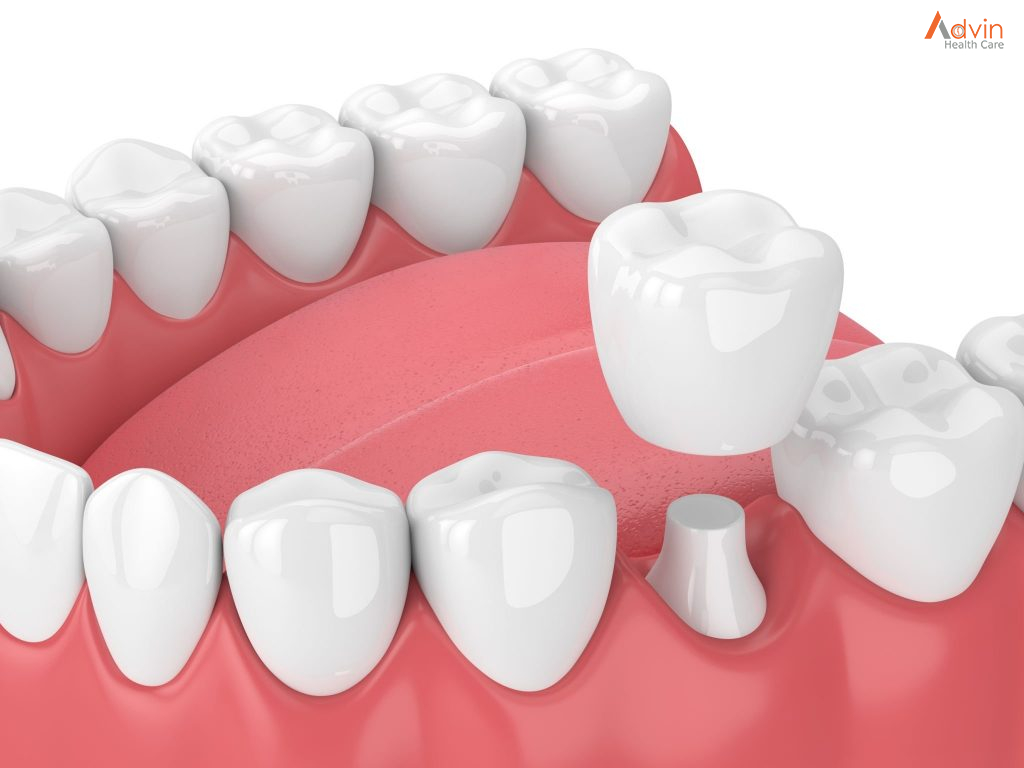
A porcelain crown is a common solution for a decayed, broken, or missing tooth. It covers the tooth above the gum line, restoring the appearance and function of the damaged tooth. However, crowns can also correct an uneven smile. Your dentist can place a crown over a short tooth, thus lengthening its appearance so it blends in with the rest of your smile. Crowns are custom-made for you, and they have a natural appearance. They’re also durable so they won’t compromise the function of your bite. In fact, crowns reinforce your teeth, making them stronger.

Braces


Regardless of your age, braces are an effective way of correcting misaligned, crowded, gapped, and crooked teeth. They cannot be used to fix chips, cracks, or other forms of damage. Consequently, braces might not be the right solution for your uneven teeth. Your dentist can recommend if corrective orthodontics is right for you. That being said, braces have helped countless patients achieve a straighter, more symmetrical smile. They gradually shift teeth into the proper position, correcting spacing issues and misaligned bites.

Clear Aligners


Clear aligners serve the same function as braces but with a different look. Whereas braces use metal brackets attached to the front of your teeth, clear aligners are made from clear plastic. Therefore, they’re a more discreet method of teeth straightening. Clear alignment trays are the best option for those wanting to keep a low profile. Like braces, clear aligners slowly shift your teeth into the right place. They use a series of clear plastic trays to move your teeth gradually.

Tympanoplasty

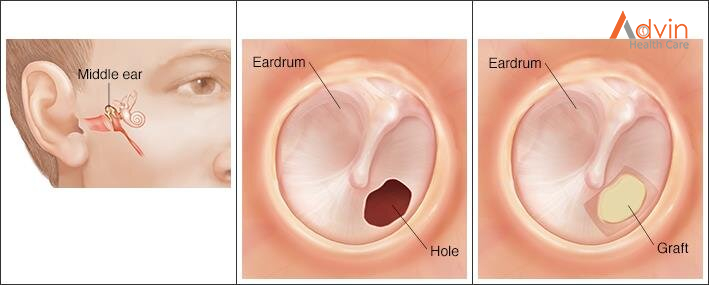
Tympanoplasty is the surgical procedure performed to repair a perforated TM, with or without reconstruction of the ossicles (ossiculoplasty), with the aim of preventing reinfection and restoring hearing ability. CSOM is the most common indication; large invasive cholesteatomas may require a mastoidectomy as well as reconstruction of the TM. The history of tympanoplasty began in the 1950s when Wullstein and Zollner popularized the technique of using overlay graft to reconstruct the perforated TM and restore the sound conduction apparatus of the middle ear. Since then, surgical approaches to tympanoplasty have been modified, as described herein.

Why Is a Tympanoplasty Done?


Doctors do a tympanoplasty when the eardrum (or tympanic membrane) has a hole that doesn’t close on its own. It is done to improve hearing and prevent water from getting into the middle ear.

Kids can get a hole in an eardrum from:

  • infections that cause the eardrum to burst
  • ventilation (ear) tubes that fall out or are removed
  • injury, such as puncturing the eardrum with a cotton swab
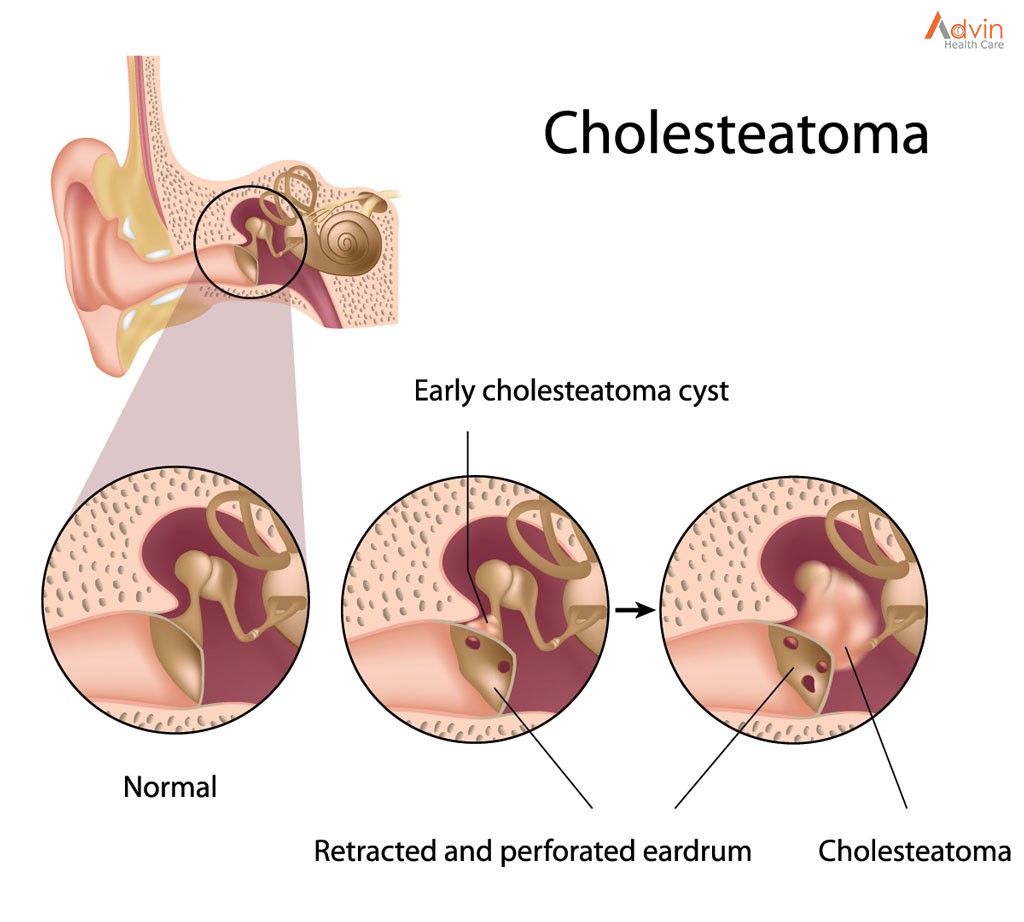
  • cholesteatoma, a growth within or behind the eardrum

Most of the time, the eardrum can repair itself. So at first, doctors closely watch a hole in a child’s eardrum rather than fix it right away. They might wait years to repair one in a very young child. This lets the ear develop enough to help prevent complications after the surgery. Surgery might also wait if a child has ongoing problems with ear infections.

Mastoidectomy


Mastoidectomy is the portion of the operation in which the surgeon removes diseased air cells (cholesteatoma matrix) from the mastoid bone. These diseased cells lie behind the honeycombed cavity (mastoid) in the temporal bone located at the sides and base of the skull behind the ear.

Mastoidectomy is typically required for patients with middle ear infections (chronic otitis media – COM), a long-standing infection affecting the middle ear and frequently accompanied by cholesteatoma (a destructive, non-cancerous skin cyst) or an unhealed eardrum perforation. This infection, if left untreated, can spread into the skull, as well as cause significant hearing loss, dizziness, and brain erosion.

The Tympan Mastoidectomy Procedure


Tympan mastoidectomy procedure is performed in a hospital setting under general anaesthesia and typically takes several hours. During the tympan mastoidectomy, incisions are made inside and behind the infected ear. The middle ear and mastoid bone are opened and the infected tissue or the cholesteatoma is removed. The eardrum is repaired with muscle lining from behind the ear.

After the tympan mastoidectomy is completed, the surgeon will place packing inside the ear to keep tissues in place as they heal. Most tympan mastoidectomy patients can be released after an overnight observation, unless they are experiencing nausea or dizziness.

Tympanoplasty and Mastoidectomy Postoperative Instructions


Tympanoplasty and Mastoidectomy recovery typically involves 1-2 weeks off of work or school. An initial follow-up appointment should take place one week after surgery for suture removal, after which most normal activity can resume. Packing will be removed periodically as the ear heals.

In some cases, a minor skin grafting procedure (Thiersch grafting) may need to be performed to assist the healing process and avoid infection. During Thiersch grafting, a layer of skin from the inside of the upper arm is transplanted over the surgical area in the ear. This grafting is usually done 10 days after the patient undergoes the tympanomastoidectomy.

It is important to closely follow your doctor’s instructions after the tympanomastoidectomy, including:

  • Do not blow your nose for at least 2 weeks after your procedure. Blowing the nose can cause pressure build-up in the ear and displace the eardrum patch. If you sneeze, keep your mouth open.
  • Do not allow any water to enter the ear. Place Vaseline-coated cotton inside the ear while showering. Any water in the ear can cause infection.
  • Do not fly for 6 weeks after surgery. Air pressure changes could negatively impact your recovery.
  • Apply antibiotic ointment to the ear canal and the incision behind the ear, as instructed.
  • Avoid heavy lifting or being fatigued.
  • Take antibiotic and pain medications as directed.

It is normal, after a tympanomastoidectomy, to have a bloody or watery discharge from the ear canal, as well as from behind the ear. You may experience some popping sounds in the ear during the first few months after surgery, as the ear heals. You should not be concerned about your hearing for 6-8 weeks after the tympanomastoidectomy, at which time your hearing will be evaluated.

During Tympnoplasty Surgery


Tympanoplasty surgery is done with in-patient hospitalization, meaning that you have to stay for 24 hours in the hospital after the surgery is completed. The surgery is usually done with general anaesthesia. The surgeon can either enter the inner ear via an ear canal (transcanal approach) or by making an incision behind the ear (postauricular approach). The process is done to reach the tympanic membrane perforation. The surgeon then uses two techniques to perform the surgery: underlay or overlay.

In the underlay technique, the graft is placed under the existing eardrum with a foam-like material that easily dissolves after several weeks. The eardrum uses the graft to cover the area of perforation. In the overlay technique, the surgeon removes the eardrum and places the graft to cover all the areas of the eardrum. The skin of the ear canal uses the graft to build a new eardrum. Once the graft is placed in the proper location and held in a foam-like material, the surgeon then sutures the incision and packs it with dressing. The whole surgery usually takes around two years to be completed.

Advin Tympanoplasty Products


Tonsillectomy Surgery

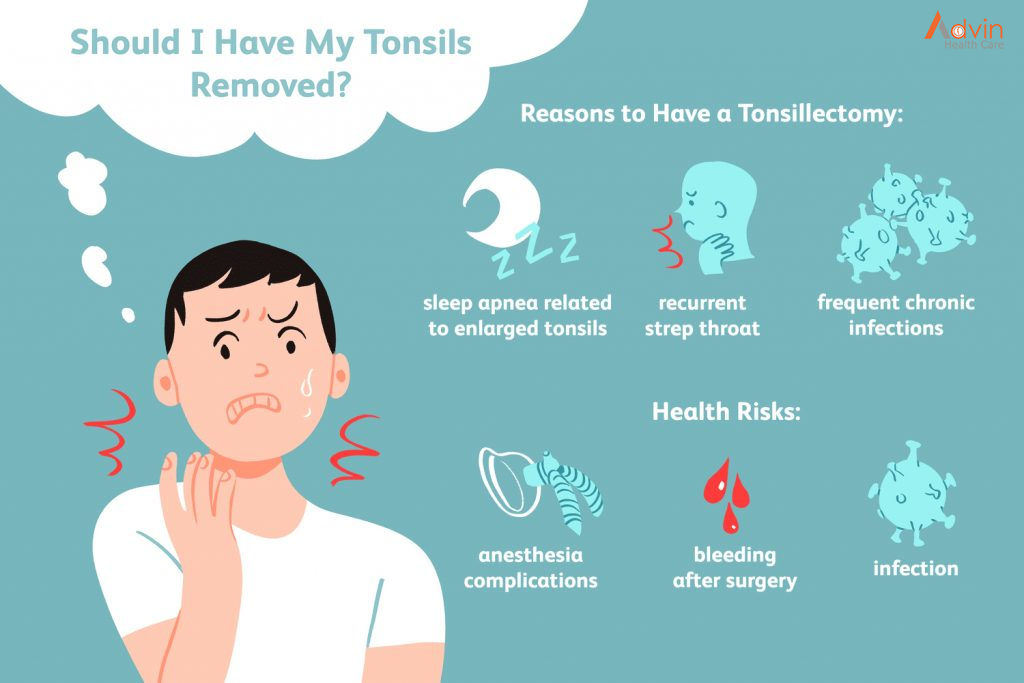
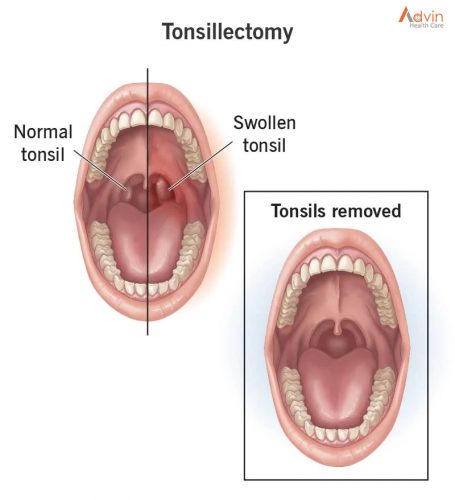
Tonsillectomy (ton-sih-LEK-tuh-me) is the surgical removal of the tonsils, two oval-shaped pads of tissue at the back of the throat — one tonsil on each side.

A tonsillectomy was once a common procedure to treat infection and inflammation of the tonsils (tonsillitis). Today, a tonsillectomy is usually performed for sleep-disordered breathing but may still be a treatment when tonsillitis occurs frequently or doesn’t respond to other treatments.

A tonsillectomy may also be necessary to treat breathing and other problems related to enlarged tonsils and to treat rare diseases of the tonsils.

Recovery time for a tonsillectomy is usually at least 10 days to two weeks.

Why is tonsillectomy done?


Healthcare providers recommend tonsillectomy for two main reasons:

  • To treat breathing-related sleep disorders, such as sleep apnea.
  • To reduce the risk of infection in people with frequent or chronic tonsillitis.

While most tonsillectomies treat children, adults can also benefit from the procedure.

Tonsillitis


The tonsils are the immune system’s first line of defense against bacteria and viruses that enter your mouth. This function may make the tonsils particularly vulnerable to infection and inflammation. However, the tonsil’s immune system function declines after puberty — a factor that may account for the rare cases of tonsillitis in adults.

A tonsillectomy may be recommended to prevent frequent, recurring episodes of tonsillitis. Frequent tonsillitis is generally defined as:

  • At least seven episodes in the preceding year
  • At least five episodes a year in the past two years
  • At least three episodes a year in the past three years

The procedure may also be recommended if:

  • A bacterial infection causing tonsillitis doesn’t improve with antibiotic treatment
  • An infection that results in a collection of pus behind a tonsil (tonsillar abscess) doesn’t improve with drug treatment or a drainage procedure

What happens before a tonsillectomy?


Before surgery, your healthcare provider will do a routine check to make sure you’re healthy enough for surgery. They may also request blood tests.

Your healthcare provider will give you a list of detailed preoperative instructions. You should follow these guidelines closely.

What happens during a tonsillectomy?


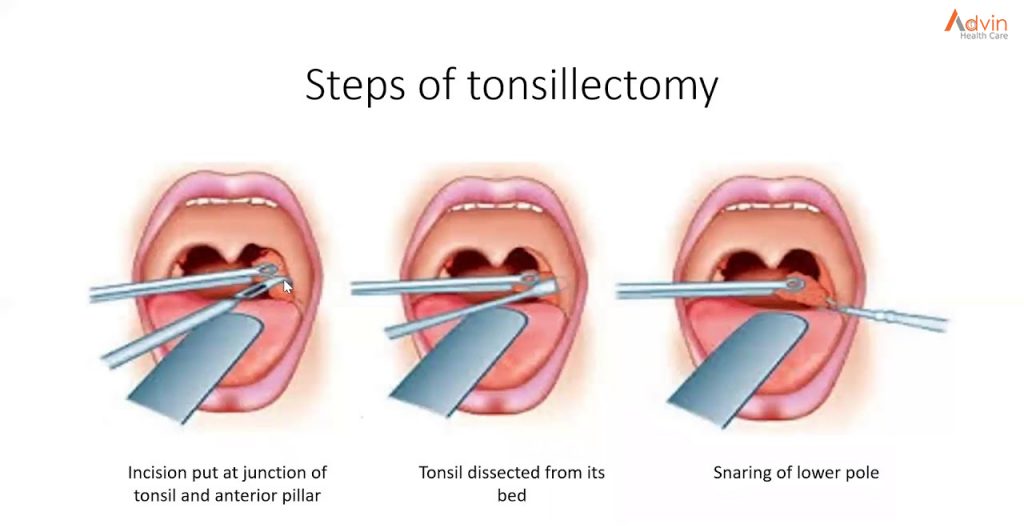
Your healthcare provider will give you general anesthesia to keep you asleep and comfortable during your procedure. Next, they’ll remove your tonsils. You won’t feel pain during this step. Surgeons use many methods to perform tonsillectomies, including:

  • Electrocautery: This method uses heat to remove the tonsils and stop any bleeding.
  • Cold knife (steel) dissection: A surgeon uses a scalpel (traditional surgical knife) to remove your tonsils. Then, they’ll stop the bleeding with electrocautery (extreme heat) or sutures.
  • Snare tonsillectomy: A surgeon uses a special surgical instrument called a snare, which has a thin wire loop at the end. Once your surgeon frees your tonsil, they’ll place this device around it to clamp it off. This helps reduce bleeding.
  • Harmonic scalpel: This method uses ultrasonic vibrations to remove your tonsils and stop bleeding at the same time.
  • Other methods include the use of radiofrequency ablation techniques, carbon dioxide lasers, and/or a microdebrider (which uses a combination of suction and cutting).

How long does a tonsillectomy take?


In most cases, a tonsillectomy takes about 20 to 30 minutes to complete. It could take longer in some instances.

What happens after a tonsillectomy?


After your tonsillectomy, your medical team will transfer you to a recovery area. There, your provider will check your vital signs (blood pressure, heart rate and blood oxygen levels) and make sure there are no postoperative complications.

Tonsillectomy is usually an outpatient procedure. This means you can go home on the same day. Complications are rare, but if they arise, your provider might keep you in the hospital overnight to monitor your progress.

Benefits of Tonsillectomy


Reduced Risk of Infections

There is an episode of tonsillitis when there is a viral or bacterial attack in the throat. Once the infection spreads to the tonsils, these inflame resulting in various symptoms. Thus, if the tonsils are removed completely, the chances of infection developing reduces to almost zero. The person may still be at the risk of colds and flu, but these will cure fast as there are no chances of the infection being chronic.

Lesser Dependency on Medicines

Taking medicines once in a while to curb the infection in the tonsils is considered to be safe. Although antibiotics can kill the infections effectively, the user sometimes has to face side effects such as dizziness, nausea, vomiting, hair fall, etc. Moreover, experts claim that prolonged use of these medicines can result in bacterial resistance to infection-fighting medicines.

Additionally, over time, these antibiotics can kill off the good bacteria along with the harmful ones. Hence, individuals suffering from repeated episodes of tonsillitis or chronic tonsillitis should consider a tonsillectomy to reduce their dependency on these antibiotics.

Better Sleep

Sometimes the tonsils become so large that they obstruct the air passage of the individual resulting in another condition- sleep apnea. The obstructive sleep apnea makes the patient gasp for breath while a person asleep and air doesn’t pass through the nasal airways.

Eventually, the person also has to face a disturbed sleep pattern. In turn, he or she feels tired and unproductive throughout the day. This impacts their regular mood too. Hence, undergoing a tonsillectomy may help them get rid of this problem permanently and help them sleep better.

Lesser Chances of Skipping Work or School

People suffering from tonsillitis of any type have to skip work or school repeatedly. The reason being that tonsillitis is contagious in nature and stepping outside the home can only increase the likelihood of a healthy person getting infected. Also, the symptoms of tonsillitis- fever, bad breath, throat pain, fatigue causes extreme discomfort to the patient. Hence, people tend to be absent from school or work. Once the tonsils are taken out, the person does not have to skip their job or school and enjoy all types of social gatherings.

Enhanced Life

Tonsillitis is a painful condition. This ailment can curb the personal growth of a person and prevent the patient from enjoying life completely. They have to be extremely cautious about their food habits or their lifestyle so that they can minimize the risk of any infection. Also, they have to miss out on various social gatherings in fear of infecting others. Therefore, patients should consider tonsil removal surgery so that they don’t miss out on the fun.

Advin Tonsillectomy Instrument Set


Rhinoplasty

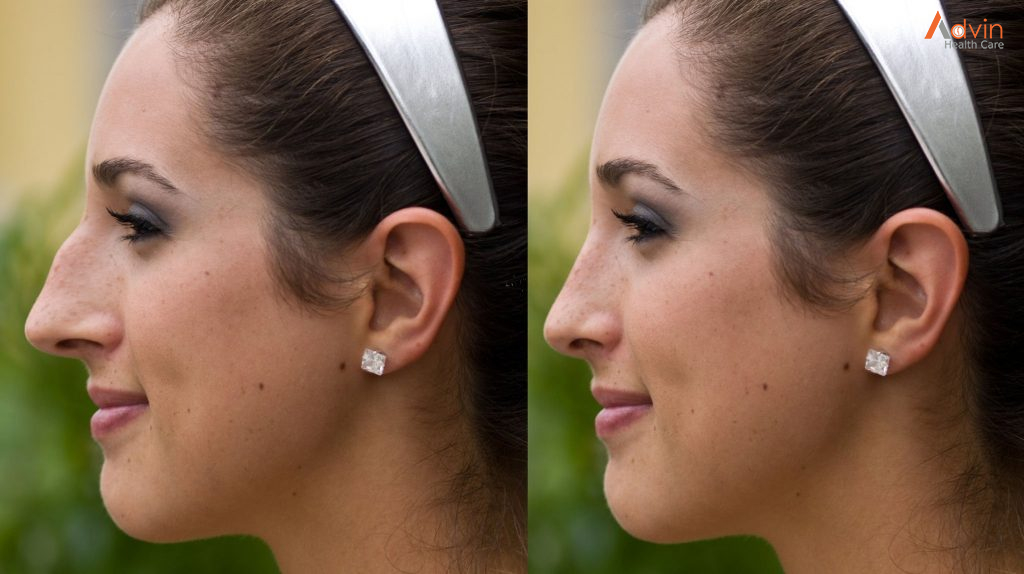
Rhinoplasty (RIE-no-plas-tee) is surgery that changes the shape of the nose. The motivation for rhinoplasty may be to change the appearance of the nose, improve breathing or both.

The upper portion of the structure of the nose is bone, and the lower portion is cartilage. Rhinoplasty can change bone, cartilage, skin or all three. Talk with your surgeon about whether rhinoplasty is appropriate for you and what it can achieve.

When planning rhinoplasty, your surgeon will consider your other facial features, the skin on your nose and what you would like to change. If you’re a candidate for surgery, your surgeon will develop a customized plan for you.

Sometimes part or all of a rhinoplasty is covered by insurance.

Reasons for Rhinoplasty


People get rhinoplasty to repair their nose after an injury, to correct breathing problems or a birth defect, or because they’re unhappy with the appearance of their nose.
Possible changes that your surgeon can make to your nose through rhinoplasty include:

  • a change in size
  • a change in angle
  • straightening of the bridge
  • reshaping of the tip
  • narrowing of the nostrils

If your rhinoplasty is being done to improve your appearance rather than your health, you should wait until your nasal bone is fully grown. For girls, this is about age 15. Boys might still be growing until they’re a bit older. However, if you’re getting surgery because of a breathing impairment, rhinoplasty can be performed at a younger age.

How you prepare


Before scheduling rhinoplasty, you must meet with your surgeon to discuss important factors that determine whether the surgery is likely to work well for you. This meeting generally includes:

  • Your medical history. The most important question your doctor will ask you is about your motivation for surgery and your goals. Your doctor will also ask questions about your medical history — including a history of nasal obstruction, surgeries and any medications you take. If you have a bleeding disorder, such as hemophilia, you may not be a candidate for rhinoplasty.
  • A physical exam. Your doctor will conduct a complete physical examination, including any laboratory tests, such as blood tests. He or she also will examine your facial features and the inside and outside of your nose. The physical exam helps your doctor determine what changes need to be made and how your physical features, such as the thickness of your skin or the strength of the cartilage at the end of your nose, may affect your results. The physical exam is also critical for determining the impact of rhinoplasty on your breathing.
  • Photographs. Someone from your doctor’s office will take photographs of your nose from different angles. Your surgeon may use computer software to manipulate the photos to show you what kinds of results are possible. Your doctor will use these photos for before-and-after assessments, reference during surgery and long-term reviews. Most importantly, the photos permit a specific discussion about the goals of surgery.
  • A discussion of your expectations.You and your doctor should talk about your motivations and expectations. He or she will explain what rhinoplasty can and can’t do for you and what your results might be. It’s normal to feel a little self-conscious discussing your appearance, but it’s very important that you’re open with your surgeon about your desires and goals for surgery.

If you have a small chin, your surgeon may speak with you about performing a surgery to augment your chin. This is because a small chin will create the illusion of a larger nose. It’s not required to have chin surgery in those circumstances, but it may better balance the facial profile.

Once the surgery is scheduled, you’ll need to arrange for someone to drive you home if you’re having an outpatient surgery.

For the first few days after anesthesia, you may have memory lapses, slowed reaction time and impaired judgment. So arrange for a family member or friend to stay with you a night or two to help with personal care tasks as you recover from surgery.

Rhinoplasty Procedure


Rhinoplasty can be done in a hospital, a doctor’s office, or an outpatient surgical facility. Your doctor will use local or general anesthesia. If it’s a simple procedure, you’ll receive local anesthesia to your nose, which will also numb your face. You may also get medication through an IV line that makes you groggy, but you’ll still be awake.

With general anesthesia, you’ll inhale a drug or get one through an IV that will make you unconscious. Children are usually given general anesthesia.

Once you’re numb or unconscious, your surgeon will make cuts between or inside your nostrils. They’ll separate your skin from your cartilage or bone and then start the reshaping. If your new nose needs a small amount of additional cartilage, your doctor may remove some from your ear or deep inside your nose. If more is needed, you might get an implant or a bone graft. A bone graft is additional bone that’s added to the bone in your nose.

The procedure usually takes between one and two hours. If the surgery is complex, it can take longer.

Recovery from Rhinoplasty


After surgery, your doctor may place a plastic or metal splint on your nose. The splint will help your nose retain its new shape while it heals. They may also place nasal packs or splints inside your nostrils to stabilize your septum, which is the part of your nose between your nostrils.

You’ll be monitored in a recovery room for at least a few hours after surgery. If everything is okay, you’ll leave later that day. You’ll need someone to drive you home because the anesthesia will still affect you. If it’s a complicated procedure, you might have to stay in the hospital for a day or two.

To reduce bleeding and swelling, you’ll want to rest with your head elevated above your chest. If your nose is swollen or packed with cotton, you might feel congested. People are usually required to leave splints and dressings in place for up to a week after surgery. You might have absorbable stitches, meaning they’ll dissolve and won’t require removal. If the stitches aren’t absorbable, you’ll need to see your doctor again a week after surgery to get the stitches taken out.

Memory lapses, impaired judgment, and slow reaction time are common effects of the medications used for surgery. If possible, have a friend or relative stay with you the first night.

For a few days after your surgery, you might experience drainage and bleeding. A drip pad, which is a piece of gauze taped below your nose, can absorb blood and mucus. Your doctor will tell you how often to change your drip pad.

You might get headaches, your face will feel puffy, and your doctor might prescribe pain medication.

Advin Products Used In Rhinoplasty Surgery


ACDF (Anterior Cervical Discectomy And Fusion) Surgery

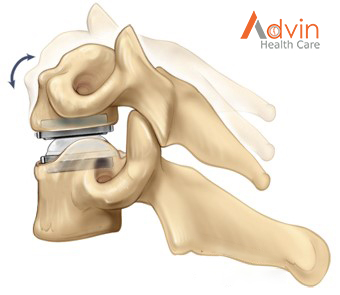
Anterior cervical discectomy and fusion is a surgery to reduce or eliminate chronic pain in the neck and back due to a problem with the discs. Anterior cervical discectomy and fusion (ACDF) is an operation to remove a degenerative or herniated disc from the neck. After the surgeon removes the damaged disc, they fuse the bones together.

The surgery is anterior because the surgeon accesses the disc through the front of the neck, rather than through the back.

What is an anterior cervical discectomy & fusion?


Between each bone of the spinal column is a cushion called an invertebral disc. These discs prevent the bones from grinding against one another and act as shock absorbers during falls, exercise, and daily activities.

Sometimes these discs become damaged, causing pain that can range from moderate to intense. An ACDF procedure may be carried out on any of the discs in between the seven cervical bones.

It is easier for the surgeon to reach the spinal column through the throat because entering through the back of the neck can harm the neck muscles and spinal column. The surgeon then moves the tissue inside the neck and throat aside to access the spine and removes any damaged discs.

To ensure that the spine is aligned and to prevent the bones of the spine from rubbing against one another, the surgery typically includes fusion of at least two bones. It is at this point during the procedure that the surgeon replaces the disc.

There are a few options for disc replacement:

  • Bone graft: A bone graft is when the surgeon attaches bone to the area to replace the disc. The bone may come from somewhere else in the person’s own body, or from a bone bank.
  • Bone graft substitute: Similar to a bone graft, this approach uses human-manufactured materials that contain shavings from the person’s bones.
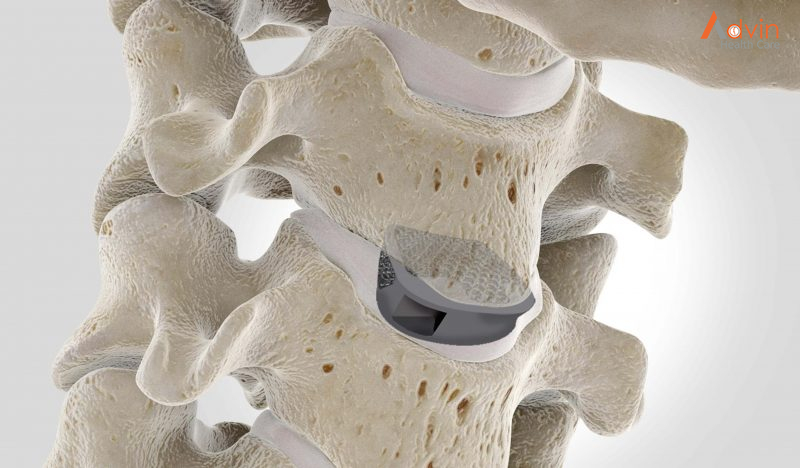
  • Arthroplasty: This is when the surgeon replaces the disc with an artificial disc.

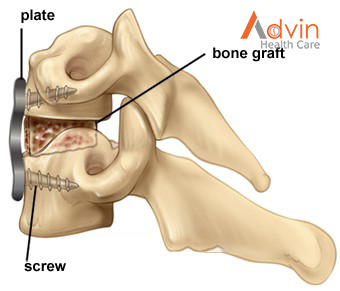
Once the replacement disc is in place, the surgeon uses a titanium plate and screws to attach the bones. When the surgery involves a bone graft, the bones will eventually grow together. Until that happens, the plate and screws provide stability.

An X-ray machine helps the surgeon ensure the replacement disc is in the right place. After the procedure, the surgeon moves the tissue of the neck and throat back to its original location and seals the wound with stitches.

What happens during surgery?


There are seven steps to the procedure. The operation generally takes 1 to 3 hours.

Step 1: prepare the patient
You will lie on your back on the operative table and be given anesthesia. Once asleep, your neck area is cleansed and prepped. If a fusion is planned and your own bone will be used, the hip area is also prepped to obtain a bone graft. If a donor bone will be used, the hip incision is unnecessary.

Step 2: make an incision
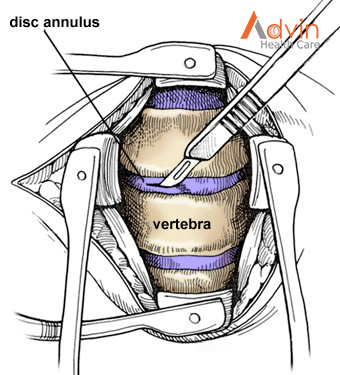
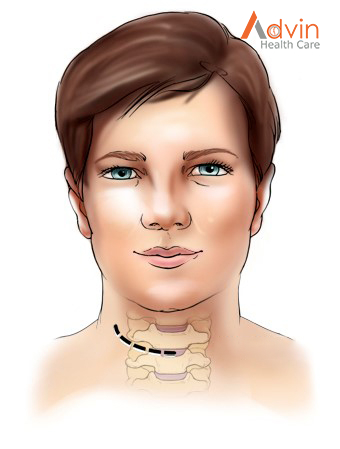
A 2-inch skin incision is made on the right or left side of your neck (Fig. 2). The surgeon makes a tunnel to the spine by moving aside muscles in your neck and retracting the trachea, esophagus, and arteries. Finally, the muscles that support the front of the spine are lifted and held aside so the surgeon can clearly see the bony vertebrae and discs.

Step 3: locate the damaged disc
With the aid of a fluoroscope (a special X-ray), the surgeon passes a thin needle into the disc to locate the affected vertebra and disc. The vertebrae bones above and below the damaged disc are spread apart with a special retractor.

Step 4: remove the disc
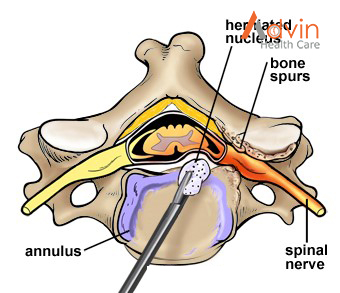
The outer wall of the disc is cut (Fig. 3). The surgeon removes about 2/3 of your disc using small grasping tools, and then looks through a surgical microscope to remove the rest of the disc. The ligament that runs behind the vertebrae is removed to reach the spinal canal. Any disc material pressing on the spinal nerves is removed.

Step 5: decompress the nerve
Bone spurs that press on your nerve root are removed. The foramen, through which the spinal nerve exits, is enlarged with a drill (Fig. 4). This procedure, called a foraminotomy, gives your nerves more room to exit the spinal canal.

Step 6. prepare a bone graft fusion
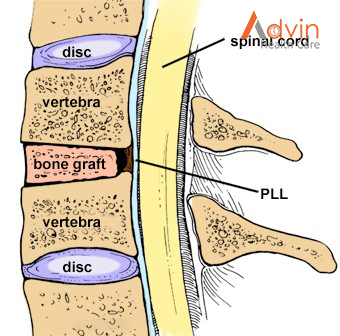
Using a drill, the open disc space is prepared on the top and bottom by removing the outer cortical layer of bone to expose the blood-rich cancellous bone inside. This “bed” will hold the bone graft material that you and your surgeon selected:

  • Bone graft from your hip.A skin and muscle incision is made over the crest of your hipbone. Next, a chisel is used to cut through the hard outer layer (cortical bone) to the inner layer (cancellous bone). The inner layer contains the bone-growing cells and proteins. The bone graft is then shaped and placed into the “bed” between the vertebrae (Fig. 5).
  • Bone bank or fusion cage.A cadaver bone graft or bioplastic cage is filled with the leftover bone shavings containing bone-growing cells and proteins. The graft is then tapped into the shelf space.

The bone graft is often reinforced with a metal plate screwed into the vertebrae to provide stability during fusion. An x-ray is taken to verify the position of the graft, plate, and screws (Fig. 6).

Alternative option: artificial disc replacement Instead of a bone graft or fusion cage, an artificial disc device is inserted into the empty disc space. In select patients, it may be beneficial to preserve motion. Talk to your doctor – not all insurance companies will pay for this new technology and out-of-pocket expenses may be incurred.

Step 7. close the incision The spreader retractors are removed.

The muscle and skin incisions are sutured together. Steri-Strips or biologic glue is placed across the incision.

Benefits of a Anterior Cervical Fusion Procedure


1. The “fusing” is a natural process.

Successful spinal decompression and fusion surgeries result in the end goal of joining two or more vertebrae together for the purpose of promoting stability and strength in the previously damaged area of the spine. However, there is a common misconception that the fusion itself takes place during the procedure. This is not the case. While all of the necessary preparatory work is completed during surgery (damaged disc and tissue are cleaned out, new bone implant is placed between the vertebrae, etc.) the fusing of the vertebrae is left to take place as a natural healing process post-surgery. This is part of what makes this procedure so successful as a long term solution. A proper recovery that results in a successful fusion will provide stability for the spine for years to come.

2. An anterior approach sometimes provides better access for your surgeon.

If there is a procedure specifically called “anterior cervical fusion” then you might assume that there is also one that takes place from a posterior approach – and you would be right! So, what’s the difference between these two surgeries? And why is the anterior incision sometimes prefered? The choice of how to approach the spine is made by assessing the location of the compressive pathology. Depending on where the problem issue is and how the cervical region of the spine is aligned, your surgeon will make a call concerning whether the surgery would be more successful if approached anteriorly or posteriorly.

3. This approach to cervical surgery offers a quick recovery.

Besides the advantage to the surgeon, there is also a benefit to the patient who undergoes an anterior spinal decompression and fusion surgery. If the spinal injury is addressed before the point of irreversible damage, patients tend to heal quickly and experience a significant degree of relief from pain. In fact, one of the most impressive aspects of anterior cervical fusion procedures is that most patients are able to leave the hospital the very next day (or, at least within 2-3 days).

4. Patients experience significant relief of pain and other symptoms.

Of course, the conversation about the benefits of decompression and fusion surgery would not be complete without discussing the most obvious reason any patient would consider having this procedure done in the first place – pain relief! Cervical herniated discs and osteoarthritis are some of the more common causes of severe neck and arm pain. These conditions are also often associated with other symptoms as well, such as numbness, tingling or weakness. A successful decompression and anterior cervical fusion procedure can correct the root issue and provide relief of the associated pain and other symptoms.

Back Surgery

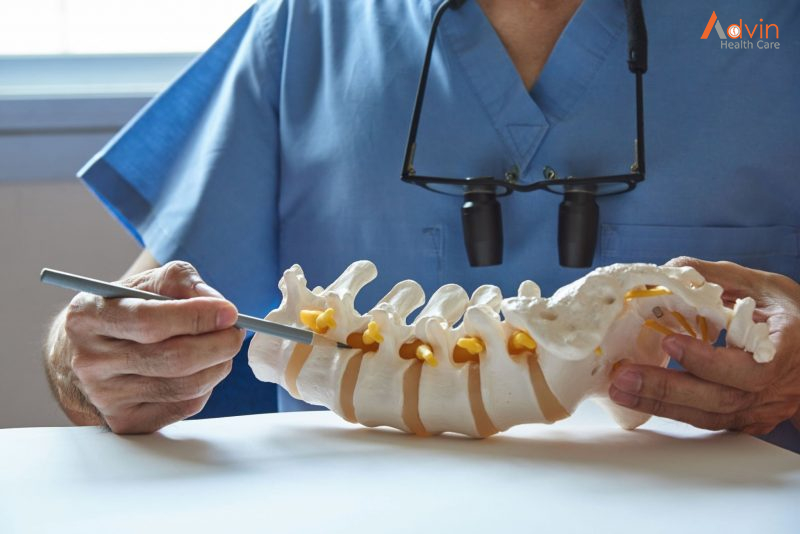
Most pain in the lower back can be treated without surgery. In fact, surgery often does not relieve the pain; research suggests that 20 to 40 percent of back surgeries are not successful. This lack of success is so common that there is a medical term for it: failed back surgery syndrome.

Nonetheless, there are times when back surgery is a viable or necessary option to treat serious musculoskeletal injuries or nerve compression. A pain management specialist can help you decide whether surgery is an appropriate choice after making sure you have exhausted all other options.

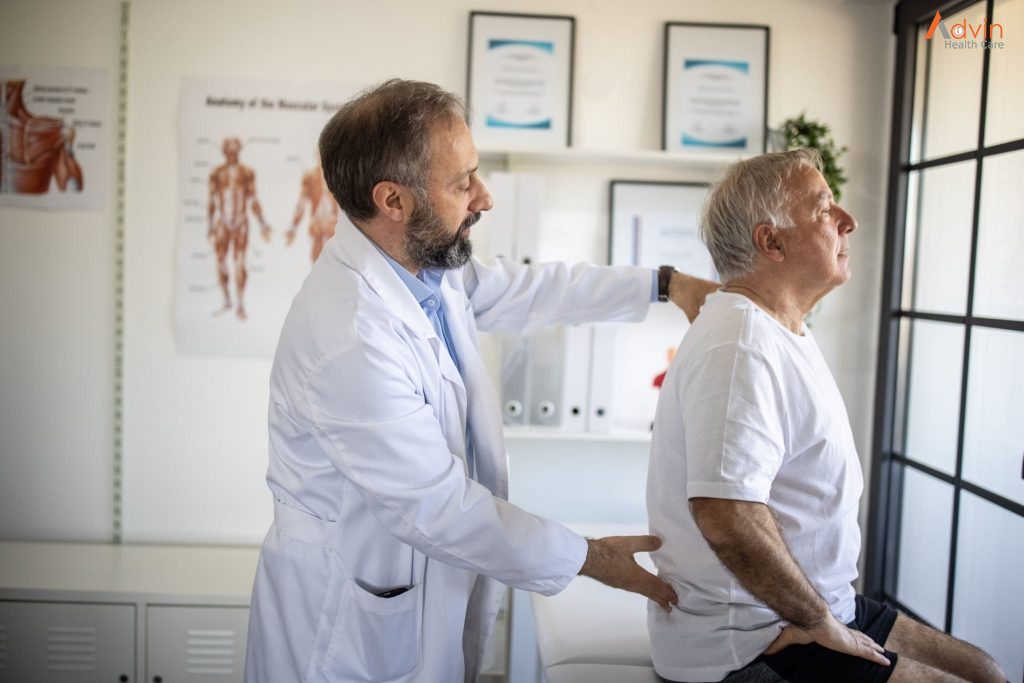
Do you need back surgery?


Back surgery might be an option if other treatments haven’t worked, and your pain is disabling.

Many people with back pain also have pain that goes down a leg. These symptoms are often caused by pinched nerves in the spine. Nerves may become pinched for a variety of reasons, including:

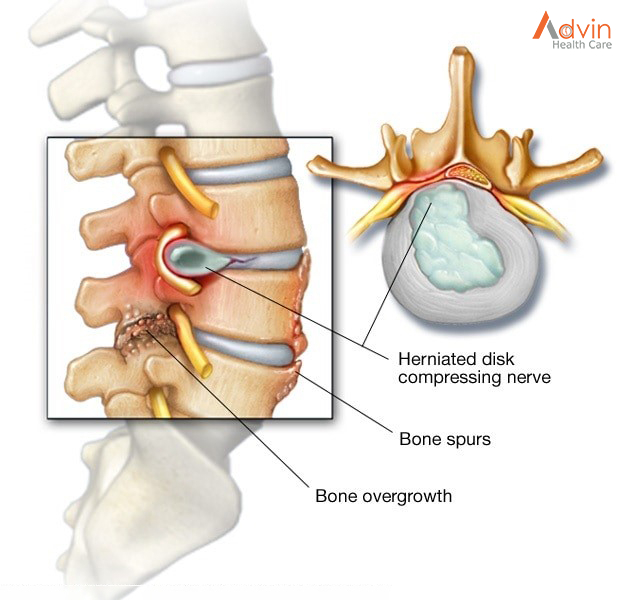
  • Disk problems. Disks are the rubbery cushions that separate the bones of your spine. A bulging or herniated disk can sometimes get too close to a spinal nerve. This can cause pain and affect how the nerve works.
  • Overgrowth of bone. Osteoarthritis can result in bone growths, often called spurs, on your spine. This excess bone can reduce the amount of space available for nerves to pass through openings in your spine.

Back surgery relieves this leg pain better than it does back pain. Many people who have back surgery continue to have pain in their backs.

It can be very difficult to pinpoint the exact cause of back pain, even if imaging tests show disk problems or bone spurs. Imaging tests taken for other reasons often reveal bulging or herniated disks that cause no symptoms and need no treatment.

When should I consider back surgery?


According to the National Institute of Arthritis and Musculoskeletal and Skin Diseases (NIAMS), part of the National Institutes of Health (NIH), the following conditions may be candidates for surgical treatment:

  • Herniated or ruptured disks, in which one or more of the disks that cushion the bones of the spine are damaged
  • Spinal stenosis, a narrowing of the spinal column that puts pressure on the spinal cord and nerves
  • Spondylolisthesis, in which one or more bones in the spine slip out of place
  • Vertebral fractures caused by injury to the bones in the spine or by osteoporosis
  • Degenerative disk disease, or damage to spinal disks as a person gets older

In rare cases, back pain is caused by a tumor, an infection, or a nerve root problem called cauda equina syndrome. In these cases, NIAMS advises surgery right away to ease the pain and prevent more problems.

Types of Back Surgery


  • Discectomy. This procedure is used to remove a disk when it has herniated and presses on a nerve root or the spinal cord. Laminectomy and discectomy are frequently performed together.
  • Foraminotomy. In this procedure, the surgeon enlarges the bony hole where a nerve root exits the spinal canal to prevent bulging disks or joints thickened with age from pressing on the nerve.
  • Artificial disk replacement. This is considered an alternative to spinal fusion for the treatment of people with severely damaged disks. The procedure involves removal of the disk and its replacement by a synthetic disk that helps restore height and movement between the vertebrae.
  • Vertebroplasty and kyphoplasty. These procedures are used to repair compression fractures of the vertebrae caused by osteoporosis. Both procedures include the injection of a glue-like bone cement that hardens and strengthens the bone.
  • Nucleoplasty, also called plasma disk decompression. This laser surgery uses radiofrequency energy to treat people with low back pain associated with a mildly herniated disk. The surgeon inserts a needle into the disk. A plasma laser device is then inserted into the needle and the tip is heated, creating a field that vaporizes the tissue in the disk, reducing its size and relieving pressure on the nerves.
  • Spinal fusion. The surgeon removes the spinal disk between two or more vertebrae, then fuses the adjacent vertebrae using bone grafts or metal devices secured by screws. Spinal fusion may result in some loss of flexibility in the spine and requires a long recovery period to allow the bone grafts to grow and fuse the vertebrae together.
  • Spinal laminectomy /spinal decompression. This is performed when spinal stenosis causes a narrowing of the spinal canal that results in pain, numbness, or weakness. The surgeon removes the bony walls of the vertebrae and any bone spurs, aiming to open up the spinal column to remove pressure on the nerves.

What Are the Benefits?


Often, the result is more than just a drop in pain. You may find:

  • You can move around better.
  • You’re more physically fit.
  • Your mood improves.
  • You don’t need to take as much pain medicine.
  • You can go back to work.
  • You’re more productive at work.

Are There Risks?


Most people who get back surgery have minimal, if any, complications.

That said, any operation has some degree of risk, including:

  • Reaction to anesthesia or other drugs
  • Bleeding
  • Infection
  • Blood clots, for instance in your legs or lungs
  • Heart attack
  • Stroke
  • Herniated disk
  • Nerve damage, which can lead to weakness, paralysis, pain, sexual dysfunction, or loss of bowel or bladder control

Knee Replacement Surgery

Knee Replacement


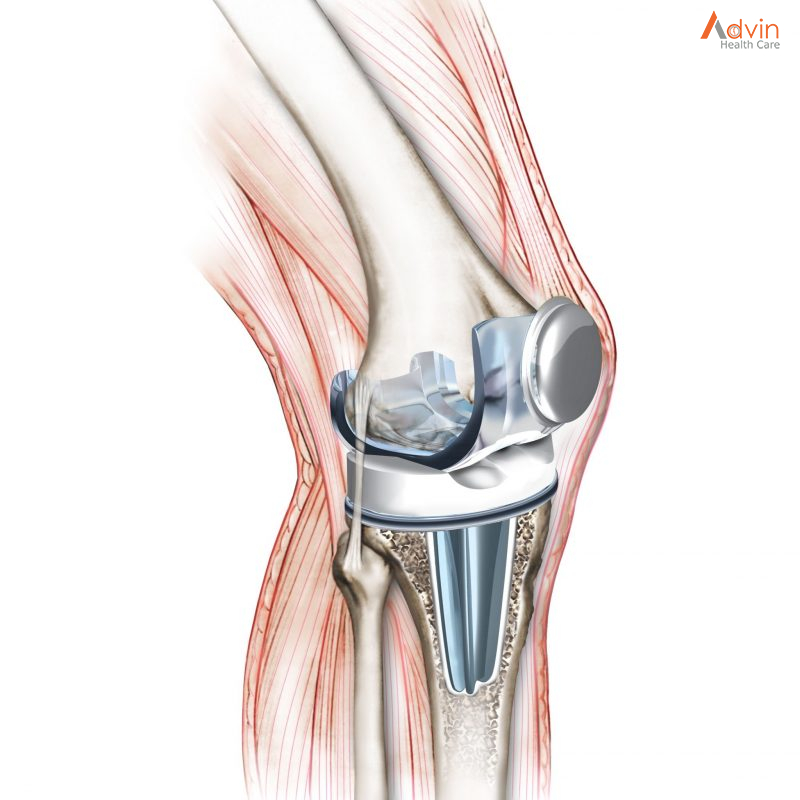
Knee replacement surgery — also known as knee arthroplasty (ARTH-row-plas-tee) — can help relieve pain and restore function in severely diseased knee joints. The procedure involves cutting away damaged bone and cartilage from your thighbone, shinbone and kneecap and replacing it with an artificial joint (prosthesis) made of metal alloys, high-grade plastics and polymers.

In determining whether a knee replacement is right for you, an orthopedic surgeon assesses your knee’s range of motion, stability and strength. X-rays help determine the extent of damage.

Your doctor can choose from a variety of knee replacement prostheses and surgical techniques, considering your age, weight, activity level, knee size and shape, and overall health.

Anatomy of the knee


Joints are the areas where 2 or more bones meet. Most joints are mobile, allowing the bones to move. Basically, the knee is 2 long leg bones held together by muscles, ligaments, and tendons. Each bone end is covered with a layer of cartilage that absorbs shock and protects the knee.

There are 2 groups of muscles involved in the knee, including the quadriceps muscles (located on the front of the thighs), which straighten the legs, and the hamstring muscles (located on the back of the thighs), which bend the leg at the knee.

Tendons are tough cords of connective tissue that connect muscles to bones. Ligaments are elastic bands of tissue that connect bone to bone. Some ligaments of the knee provide stability and protection of the joints, while other ligaments limit forward and backward movement of the tibia (shin bone).

The knee consists of the following:

  • Tibia: This is the shin bone or larger bone of the lower leg.
  • Femur: This is the thighbone or upper leg bone.
  • Patella: This is the kneecap.
  • Cartilage: A type of tissue that covers the surface of a bone at a joint. Cartilage helps reduce the friction of movement within a joint.
  • Synovial membrane: A tissue that lines the joint and seals it into a joint capsule. The synovial membrane secretes synovial fluid (a clear, sticky fluid) around the joint to lubricate it.
  • Ligament: A type of tough, elastic connective tissue that surrounds the joint to give support and limits the joint’s movement.
  • Tendon: A type of tough connective tissue that connects muscles to bones and helps to control movement of the joint.
  • Meniscus: A curved part of cartilage in the knees and other joints that acts as a shock absorber, increases contact area, and deepens the knee joint.

What is knee replacement and why is it useful?


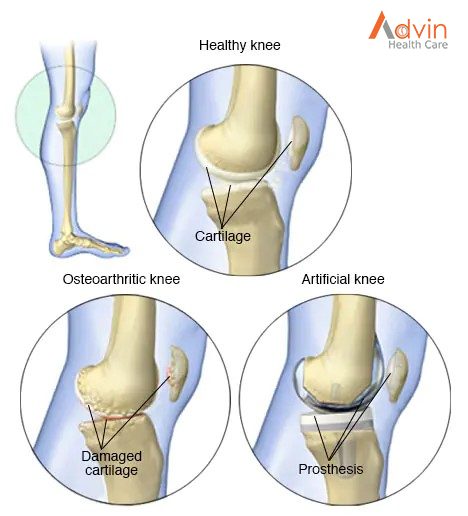
Knee replacement is a kind of arthroplasty. Arthroplasty literally means “the surgical repair of a joint,” and it involves the surgical reconstruction and replacement of degenerated joints, using artificial body parts, or prosthetics.

When the articular cartilage of the knee becomes damaged or worn, it becomes painful and the knee is hard to move. Instead of sliding over each other, the bones rub and crush together.

With a prosthesis, the patient will feel less pain, and the knee will move properly.

Why have knee replacement surgery?


There are three common reasons for the procedure:

Osteoarthritis: this type of arthritis is age related, caused by the normal wear and tear of the knee joint. It mostly affects patients aged over 50 years, but younger people may have it.

Osteoarthritis is caused by inflammation, breakdown, and the gradual and eventual loss of cartilage in the joints. Over time, the cartilage wears down and the bones rub together. To compensate, the bones often grow thicker, but this results in more friction and more pain.

Rheumatoid arthritis: also called inflammatory arthritis, the membrane around the knee joint to become thick and inflamed. Chronic inflammation damages the cartilage, causing soreness and stiffness.

Post-traumatic arthritis: this type of arthritis is due to a severe knee injury. When the bones around the knee break or the ligaments tear, this will affect the knee cartilage.

Types of knee replacement surgery


Knee replacement can be total or partial.

Total knee replacement (TKR): Surgery involves the replacement of both sides of the knee joint. It is the most common procedure.

Surgery lasts between 1 and 3 hours. The individual will have less pain and better mobility, but there will be scar tissue, which can make it difficult to move and bend the knees.

Partial knee replacement (PKR): Partial replacement replaces only one side of the knee joint. Less bone is removed, so the incision is smaller, but it does not last as long as a total replacement.

PKR is suitable for people with damage to only one part of the knee. Post-operative rehabilitation is more straightforward, there is less blood loss and a lower risk of infection and blood clots.

The hospital stay and recovery period are normally shorter, and there is a higher chance of more natural movement.

What you can expect


Before the procedure

Knee replacement surgery requires anesthesia. Your input and preference help the team decide whether to use general anesthesia, which makes you unconscious, or spinal anesthesia, which leaves you awake but unable to feel pain from your waist down.

You’ll be given an intravenous antibiotic before, during and after the procedure to help prevent post-surgical infection. You might also be given a nerve block around your knee to numb it. The numbness wears off gradually after the procedure.

During the procedure

Your knee will be in a bent position to expose all surfaces of the joint. After making an incision about 6 to 10 inches (15 to 25 centimeters) long, your surgeon moves aside your kneecap and cuts away the damaged joint surfaces.

After preparing the joint surfaces, the surgeon attaches the pieces of the artificial joint. Before closing the incision, he or she bends and rotates your knee, testing it to ensure proper function. The surgery lasts about two hours.

After the procedure

You’ll be taken to a recovery room for one to two hours. How long you stay after surgery depends on your individual needs. Many people can go home that same day. Medications prescribed by your doctor should help control pain.

You’ll be encouraged to move your foot and ankle, which increases blood flow to your leg muscles and helps prevent swelling and blood clots. You’ll likely receive blood thinners and wear support hose or compression boots to further protect against swelling and clotting.

You’ll be asked to do frequent breathing exercises and gradually increase your activity level. A physical therapist will show you how to exercise your new knee. After you leave the hospital, you’ll continue physical therapy at home or at a center.

Do your exercises regularly, as instructed. For the best recovery, follow all of your care team’s instructions concerning wound care, diet and exercise.

Advin Knee Replacement Products


Knee Arthroscopy

Knee Arthroscopy


Knee arthroscopy is a surgical procedure that allows doctors to view the knee joint without making a large incision (cut) through the skin and other soft tissues. Arthroscopy is used to diagnose and treat a wide range of knee problems.

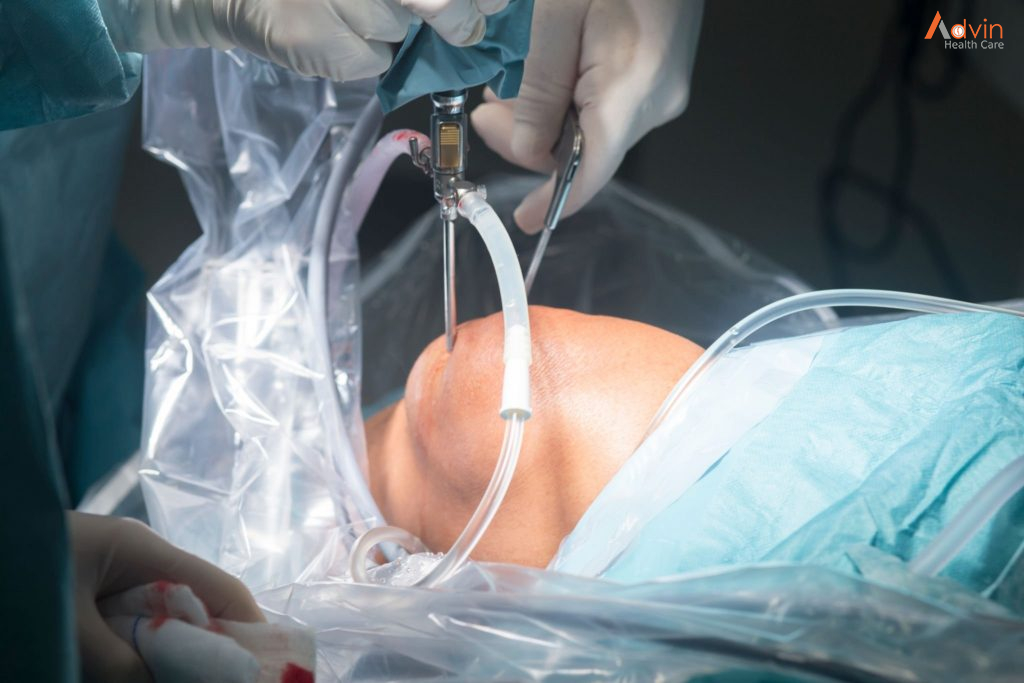
During knee arthroscopy, your surgeon inserts a small camera, called an arthroscope, into your knee joint. The camera displays pictures on a video monitor, and your surgeon uses these images to guide miniature surgical instruments.

Because the arthroscope and surgical instruments are thin, your surgeon can use very small incisions, rather than the larger incision needed for open surgery. This results in less pain and joint stiffness for patients, and often shortens the time it takes to recover and return to favourite activities.

Your knee is the largest joint in your body and one of the most complex. The bones that make up the knee include the lower end of the femur (thighbone), the upper end of the tibia (shinbone), and the patella (kneecap).

Other important structures that make up the knee joint include:

  • Articular cartilage.The ends of the femur and tibia, and the back of the patella are covered with articular cartilage. This slippery substance helps your knee bones glide smoothly across each other as you bend or straighten your leg.
  • The knee joint is surrounded by a thin lining called synovium. This lining releases a fluid that lubricates the cartilage and reduces friction during movement.
  • Two wedge-shaped pieces of meniscal cartilage between the femur and tibia act as shock absorbers. Different from articular cartilage, the meniscus is tough and rubbery to help cushion and stabilize the joint.
  • Bones are connected to other bones by ligaments. The four main ligaments in your knee act like strong ropes to hold the bones together and keep your knee stable.
    • The two collateral ligaments are found on either side of your knee.
    • The two cruciate ligaments are found inside your knee joint. They cross each other to form an X with the anterior cruciate ligament in front and the posterior cruciate ligament in back.

Who needs knee arthroscopy?


Your healthcare provider may recommend knee arthroscopy if you have knee pain that doesn’t get better with nonsurgical treatments. Nonsurgical treatments include rest, ice, nonsteroidal anti-inflammatory drugs and physical therapy (PT). Although arthritis causes knee pain, arthroscopic knee surgery isn’t always an effective treatment for osteoarthritis.

Healthcare providers use arthroscopy to get a better look at cartilage, bones and soft tissues inside of your knee. They use the procedure to diagnose several types of knee injuries. Most of these injuries affect ligaments and cartilage in your knee joint.

Knee injuries among athletes (including adolescents) are very common. They can happen in contact sports and those that require jumping, such as volleyball.

What happens during knee arthroscopy?


During the procedure, your healthcare provider:

  1. Cleans your leg and secures your knee in a stabilizing device. The device ensures that your knee stays in the proper position throughout the procedure.
  2. Makes a small incision (cut) in your knee and inserts a long metal tool called an arthroscope into the incision. The arthroscope has a camera on the end. Images from the camera appear on a screen in the operating room.
  3. Looks at the images on the monitor and uses them to diagnose injuries and guide the procedure. If you need surgery, your healthcare provider makes other incisions in your knee and inserts tiny tools through them.
  4. Repairs torn tissues, shaves off damaged bone or cartilage and removes inflamed or damaged tissues. Your healthcare provider uses specially designed tools for these tasks.
  5. Closes the incisions with stitches or small bandages, and wraps your knee with a larger bandage or dressing.

What are the advantages of knee arthroscopy?


Minimally invasive procedures like knee arthroscopy usually require less recovery time than traditional (open) surgery. As you only need a few small stitches, you’re more likely to get back on your feet more quickly than with traditional surgery. You may also have less pain and a lower risk of infection.

Advin Arthroscopy Instrument


Glaucoma Surgery

Glaucoma


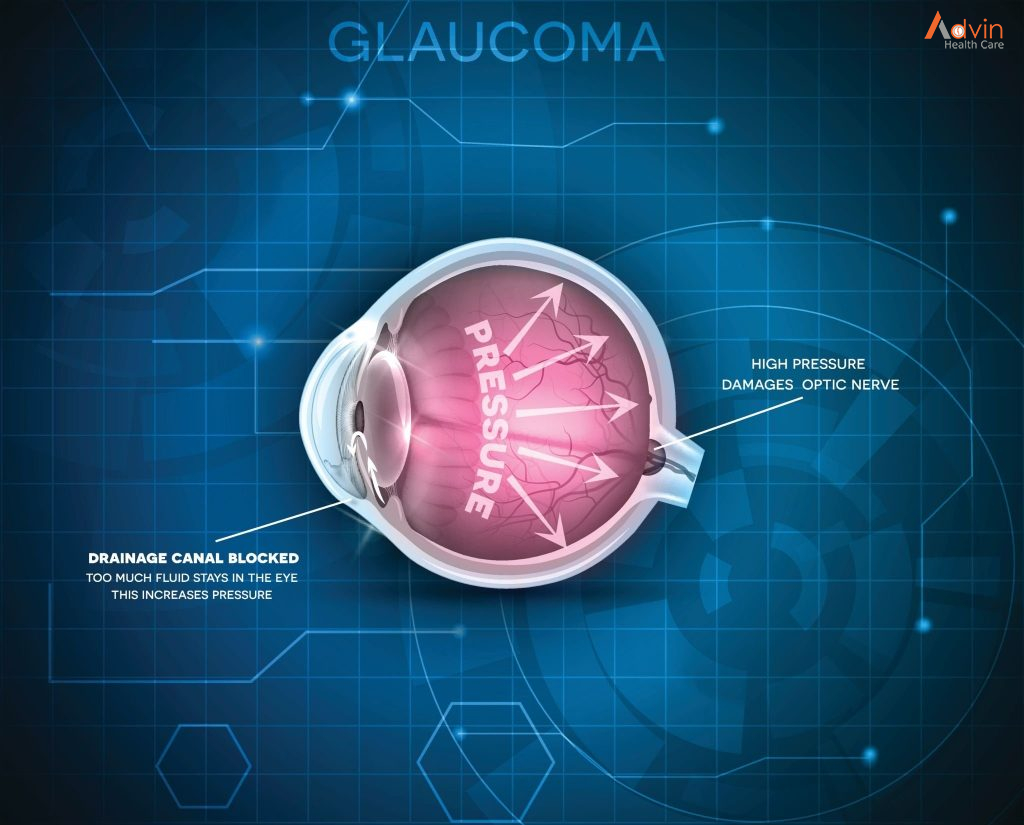
Glaucoma is a group of eye conditions that damage the optic nerve. The optic nerve sends visual information from your eye to your brain and is vital for good vision. Damage to the optic nerve is often related to high pressure in your eye. But glaucoma can happen even with normal eye pressure.

Glaucoma can occur at any age but is more common in older adults. It is one of the leading causes of blindness for people over the age of 60.

Many forms of glaucoma have no warning signs. The effect is so gradual that you may not notice a change in vision until the condition is in its later stages.

It’s important to have regular eye exams that include measurements of your eye pressure. If glaucoma is recognized early, vision loss can be slowed or prevented. If you have glaucoma, you’ll need treatment or monitoring for the rest of your life.

5 Types of Glaucoma Surgery


The following are types of glaucoma surgeries proven to restore normal eye pressure:

1. Laser surgery

Laser therapy is a common treatment for glaucoma. For instance, selective laser trabeculoplasty (SLT) is a first-line treatment for open-angle glaucoma.3

During SLT surgery, an ophthalmologist uses a laser beam to make microscopic holes in the eye that enable eye fluid to flow better.

Other types of laser surgeries for glaucoma include argon laser trabeculoplasty (ALT) and laser peripheral iridotomy (LPI)

According to the Glaucoma Research Foundation (GRF), laser glaucoma surgery may reduce intraocular pressure by 20 to 30%. It’s effective in roughly 80% of patients.4

2. Electrocautery

Electrocautery is a minimally invasive glaucoma surgery (MIGS).5

During this procedure, the surgeon will create a tiny incision in the eye’s drainage tubes using a device known as a trabectome.

The device uses heat to remove tissue in the eye, releasing the built-up fluid.

According to studies, trabectome surgery can reduce eye pressure by 30 percent.6

3. Trabeculectomy

Trabeculectomy is also effective in reducing IOP.

During trabeculectomy, the surgeon will create a small flap in the white area of the affected eye. This creates a drainage pathway for excess fluid.

You may need medication after the surgery to prevent scar tissue from forming.

4. Drainage Implant Surgery

Drainage implant surgery is an invasive surgical procedure.

It involves the placement of a small drainage tube known as an aqueous shunt or tube shunt in the affected eye to drain the fluid.7

Glaucoma drainage implant surgery is performed in a hospital or an outpatient surgical facility. It usually takes about an hour or less to perform the procedure.

5. Microtrabeculectomy

Microtrabeculectomy involves inserting microscopic-sized tubes into the drainage angle to drain excess aqueous fluid.

The fluid drains from the anterior chamber of the eye to beneath the conjunctiva (the eye’s outer membrane).

What to Expect Before & After Surgery


Glaucoma surgery is done at your doctor’s office or an outpatient not facility.

Below is what to expect before and after surgery:

Before


Before undergoing surgery, the medical staff will prepare you mentally to ensure you’re comfortable. You will then go to the operation room, where you will lie on the operating table.

In the room, there will be an eye surgeon, a nurse, and surgical assistants.

Your eyes will be cleaned and your face covered, leaving only the infected eye exposed.

Your doctor will also install devices to monitor your heart rate, blood pressure, and oxygen levels throughout the procedure.

An anesthesiologist will also be present to administer sedatives to keep you relaxed during surgery.

After

After surgery, you’ll be allowed to rest your eyes for a moment.

During this time, your eye doctor will continuously monitor your eye pressure. If everything seems okay, you’ll be discharged.

However, before you leave, the eye doctor will instruct you on the dos and don’ts after glaucoma surgery.

You may also be required to schedule a follow-up appointment.

After glaucoma surgery, your eye will be patched up for some time. This may affect your ability to see. In addition, the effects of sedation also affect your ability to operate machinery.

To be safe, make sure you have someone to drive you home.

What are the benefits of surgery?


The aim is to lower the pressure in your eye to reduce the risk of further damage to the optic nerve.

Advin Instruments Used In Glaucoma Surgery


Retinal Detachment Surgery

Retinal Detachment Surgery


Retinal detachment describes an emergency situation in which a thin layer of tissue (the retina) at the back of the eye pulls away from its normal position.

Retinal detachment separates the retinal cells from the layer of blood vessels that provides oxygen and nourishment to the eye. The longer retinal detachment goes untreated, the greater your risk of permanent vision loss in the affected eye.

Warning signs of retinal detachment may include one or all of the following: reduced vision and the sudden appearance of floaters and flashes of light. Contacting an eye specialist (ophthalmologist) right away can help save your vision.

What is a Retinal Detachment?


The retina is the light-sensitive layer of nerve tissue that lines the inside of the eye and sends visual messages through the optic nerve to the brain. A retinal detachment occurs when the retina becomes separated from the rest of the layers of the eye. This usually occurs after you develop a tear in the retina. The extent of permanent damage depends on how much of the retina becomes detached and whether or not the centre of the retina (the macula) becomes detached. The macula is made up of special nerve cells that provide the sharp central vision needed for seeing fine detail. If your macula has become detached, you have a poorer visual prognosis and you may not regain good enough vision to read or drive with that eye even after successful surgery.

Why do I have a Retinal Detachment? What are the symptoms?


A retinal detachment occurs when a tear forms in the retina allowing fluid to get under the retina forming a detachment. They are more common in patients who are very near- sighted, have a family history of retinal detachment, and in eyes that have had prior trauma or eye surgery. Patients often complain of flashes, new floaters and a shadow forming in their vision when a retinal detachment occurs.

Surgical Procedure


Your retinal detachment surgery will likely involve a scleral buckling and/or vitrectomy procedure. We use the most advanced surgical equipment and techniques available for retinal detachment surgery. A scleral buckling surgery involves positioning a silicone band around your eye beneath your eye muscles to bring in the walls of your eye. This elongates your eye and makes you more near sighted. A vitrectomy surgery involves making 3 holes in the eye and using instruments to remove the jelly-like substance (the vitreous humour) that normally fills the centre of the eye. The removal of the vitreous inside the eye does not cause any permanent harm. The vitreous is replaced by natural fluid produced inside the eye. The retina is then reattached and all retinal tears surrounded by laser. The eye is then filled with an inert gas to keep the retina in position as it heals. The gas bubble will dissipate from your eye within 4-6 weeks. You cannot change elevation (fly on an airplane) or undergo general anaesthesia with nitrous oxide gas while a gas bubble is in your eye. We will place a green bracelet around your wrist indicating this after surgery, do not take off the bracelet until the gas dissipates from your eye. In certain cases, we may use silicone oil instead of gas; your surgeon will review with you if this is appropriate for your surgery.

Retinal reattachment surgery usually takes one-two hours to perform. It is typically performed the under local anaesthesia so that you are awake and comfortable during the procedure and have minimal complications from anaesthesia postoperatively. If you are awake, it is very important for you stay still during surgery.

What are the benefits of Retina surgery?


The clear benefit of retinal detachment surgery is that it prevents you from blindness in that eye. The degree of recovery of vision is dependent upon a multitude of factors. These include the initial cause of retinal detachment, extent of retinal detachment by the time of initial surgery, pre-existing eye conditions, the presence of retinal PVR scarring, whether your retina re–detaches, and the success of initial surgery which is significantly dependent upon the experience and competence of your surgeon.

Advin Instrument For Retina Surgery